|
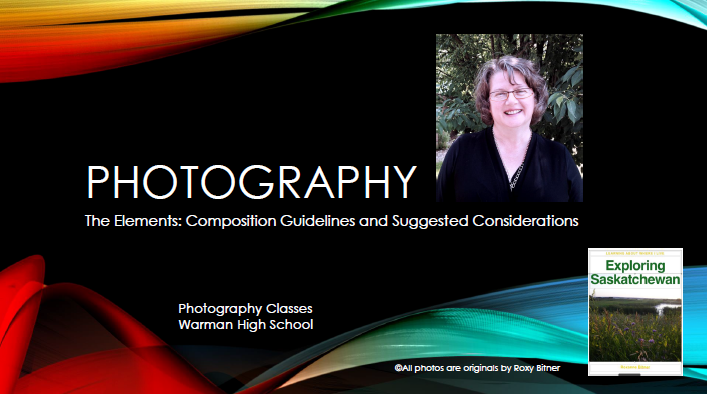
Photography 10 is an introductory course intended to give students a basic understanding of photography and editing. Students will take a variety of photos, learn to edit, and evaluate them according to the elements of composition. The final project will require that students incorporate all learning to prepare a study of a chosen subject, theme, or scene.
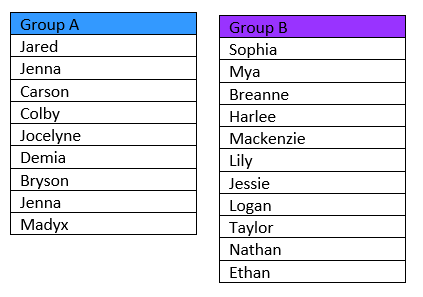
Note: This course begins on Thursday, March 25, 2021 and runs until Friday, May 14, 2021. Final Presentations will be given on Thursday, May 13, 2021 (Group A) and Friday, May 14, 2021 (Group B).
|
*Please note that the course has been adapted to compensate for online delivery and may not be exactly as shown on the course outline above.
| ||
For my classes, please check your Office 365 email on a regular basis. You go to Office 365 and access the account with your username (i.e. [email protected]) and usual password. That is where you go to see my emails (personal or group). Photography students post assignments on their websites as always, but use email to ask questions.
|
| ||||

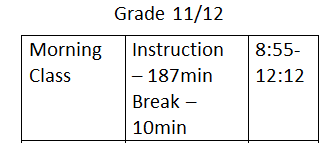
To keep the class on the same schedule, Grade 10's will follow the Grade 11/12 time schedule for this class.
Classroom expectations: The bell schedule will be followed to observe requirements for social distancing. Attendance will be taken at the beginning of class and each hour thereafter. Please be on time. The break time will be at the discretion of your teacher, but you will have time to go to the washroom and fill up your water bottle in that time. It will be at approximately the same time each day. Use your break well so that you can stay focused in class.
|


We are still expected to cover all the material outlined in this course in the time allotted. A two-hour period requires that you are focused for two hours.
|
Important Messages for All Photography Students:
- You will need to bring a flash drive (memory stick) and your phone charge cord back and forth to class. Please be prepared to do this early on in the class since we start using both right away.
- In the first class, we will be making a personal website for each of you so that you learn how to use this valuable format and so that you can submit your assignments. I do not take assignments in any other way. Please do not submit assignments via my email or Google Classroom.
- I love hearing from my students. Do not fret about anything. Immediately send me an email with your questions or concerns. I am delighted to help you out. I check my email twice a day, so you won't have to wait long for a reply. You can also send me a message via Google Classroom. [email protected]
- Although I do not use Google Classroom for giving or collecting assignments, I do indicate when assignments are due there. The website also has these dates. The website is your go-to for information. I have worked very hard and long to make it for you, so please use it every home and school work day. rbclasses.weebly.com
- Online Wednesdays are required. We will meet at 9:00 for attendance and lessons will be taught there that are not taught in class. Be prompt. The password to get into the class is "Bitner". Go to "Meet" in the Google waffle (I will explain in class before our first session) and type in the password.
Group B take Note - Since you are to do your first two classes from home, here are your instructions:
You will notice that the course is laid out in modules below. You will be working at Module 1, Parts 1 and 3 on March 25th and 29th.
You will notice that the course is laid out in modules below. You will be working at Module 1, Parts 1 and 3 on March 25th and 29th.
- Photography Magic/Illusions - for this assignment (read instructions below), all you need to do is set-up and take the photos. Bring them to school on your phone or a memory stick.
- Career PowerPoint - read through the assignment. You can access your school accounts by doing a Google search for "Office 365", and typing in your email username and password. Choose PowerPoint and start making your slideshow. See the module for a sample of what a typical page would look like. Remember, all the writing must be in your own words since 0% is given for copy/paste.
- Clear Space on your Phone - If there is not at least 8 MB of space on your phone, please clear space on your phone.
- Do not worry about the website. I will get you all set up on your first day in class. I look forward to seeing you all.
|
M01: Research & Website
M02: Elements of a Good Photo M03: Camera Components & Use M04: Variety of Shots M05: Light/Shadow/Colour/Balance M06: Photoshop Adjustments M07: Photoshop Manipulation M08: Safe & Ethical Practices M09: Project Planning M10: Final Project 
|
Please note that the Modules with ** in front of the title will be covered in 2020-21. Due to the reduction in class/teacher direct contact, some parts of the curriculum needed to be touched on in other units.
**Module 01: Career Research & Website
Part 1 - Photography Magic/Illusions
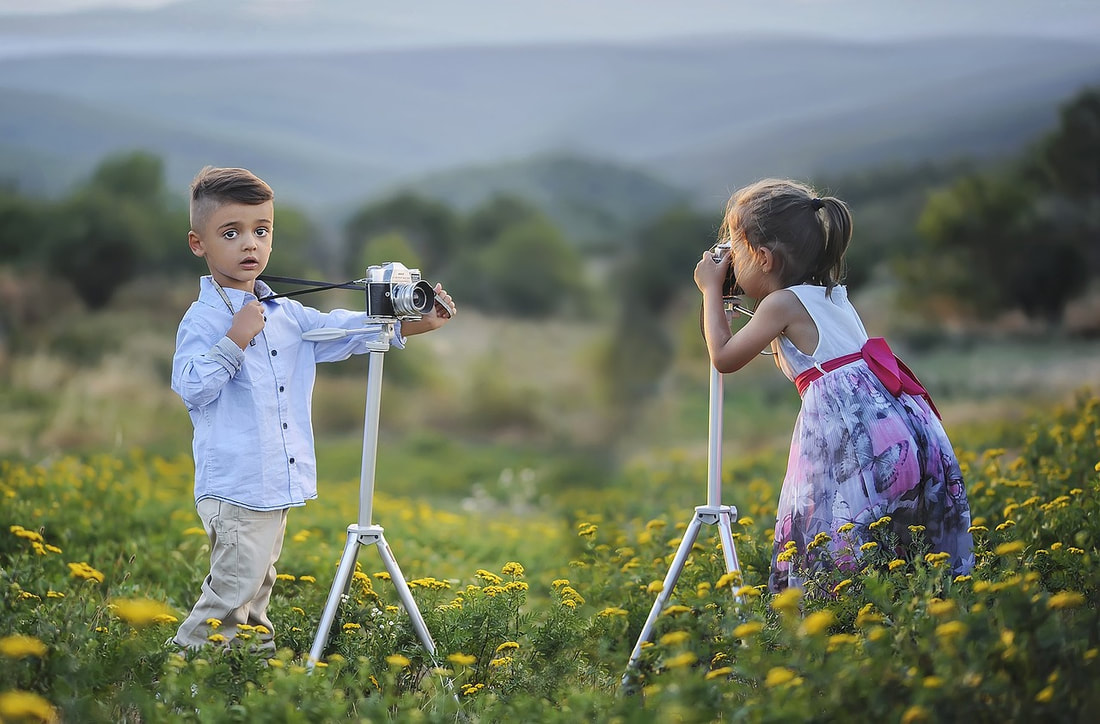
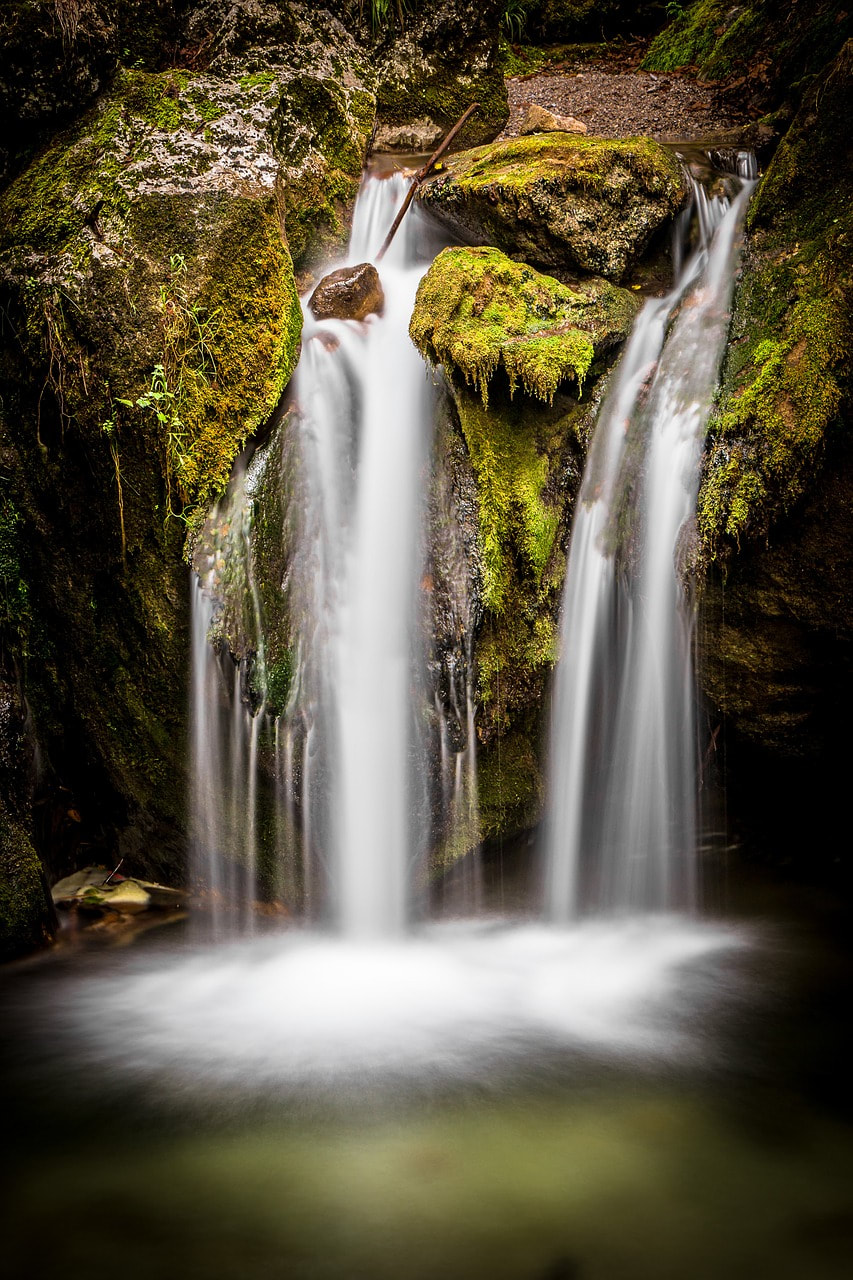
We will start out by having a little fun setting up shots. Photography is fun. Learning the skills needed to take great photos is important. One of the first things we need to understand is that taking great photos often takes time. Point and shoot photos are sometimes great by chance, being in the right place at the right time. But, when we check out the masters, you will see how they sometimes take hours to get that perfect shot. They take lots of the same shot to get the best image. Assignment:
Part 2 - Making a Website
In order to display original photographs and assignments for marking, each student will create a private weebly.com website in the instructor's account. These sites are only available to be viewed by the instructor and student (of course, to be shared with parents). Photos/assignments must be uploaded to the website for each unit by the specified due date. Students must place all assignments, as directed, on their own website for marking. It is important that students hit Publish once the assignment is added or the instructor will not be able to see the assignment. An assignment is not considered to be complete until it is published. In addition to the assignments, the following must be completed. These items count toward the website setup mark.
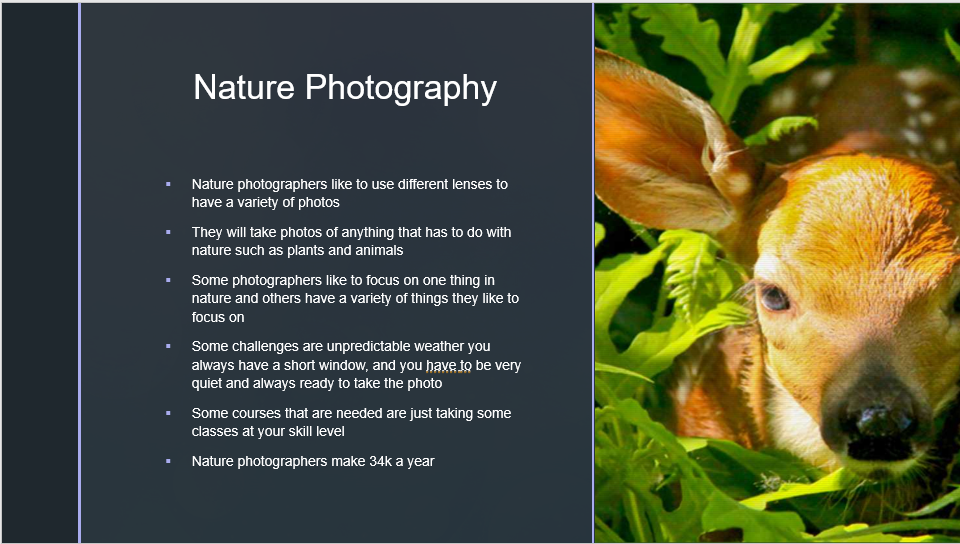
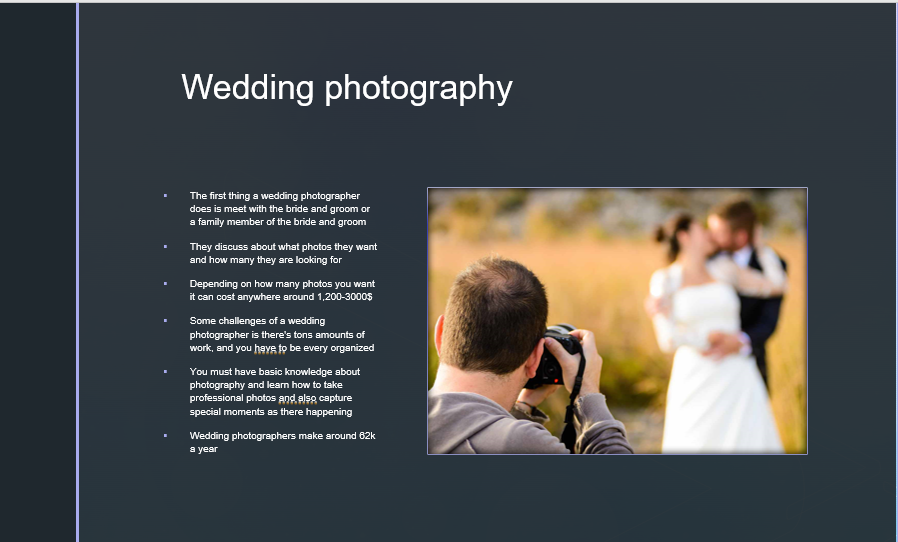
Part 3 - Careers in Photography For this assignment, you will be creating a nine-slide PowerPoint to learn/teach your peers about the vast variety of careers available for photographers. Students are free to retrieve photos online from creativecommons.com or wikimedia.com. The following components are necessary for a completed project: Slide 1 - Title Page - includes the title "Careers in Photography", your name, a background (not from templates), and a suitable photo (from Pixabay.com or other copyright-free site). Slides 2 - 9 Choose a Career - research and write in point form in your own words: a) Title of Career, b) at least one photo of someone actively engaged in that job or of the type of photo they may take, c) jot note points with a comprehensive description of the job (training, responsibility, salary/pay, challenges), d) background (not white or a template). Here are some sample pages so you know what is expected:
Store the Power Point in your documents in your Photography10 folder on Office365. Attach the finished PP as a file onto your "Careers in Photography" web page on your website. Your instructor will show you how. Put your name on the teacher whiteboard when you are ready for marking if done before the due date.
Due Date: Tuesday, April 20, 2021 Assessment: see rubric below
**Module 02: Elements of a Good Photo Students study the Elements of a Good Photograph in class. This was done using an instructor created Power Point. A PDF version is on the main Photography page for review following the lesson.
Students must now take pictures utilizing eight of these techniques The "Elements" page on your website is where the photos need to be placed, and you must put a text box below each to name the element you have captured in your photo. Due Date: Tuesday, April 20, 20201 Assessment: see checklist document below. As shown in class, drag your photos from your phone to your Photography 10 Office365 account (or your USB) so you have a high quality version for editing later in Photoshop. Below, there is a list of the elements in the PowerPoint if you wish to print it. Alternatively, you can pick up a hard copy of the list if you choose from the wire rack at the front of the classroom.
**Module 03: Camera Components & UseIn the lesson, we will discuss the various options for taking digital photographs. Whatever device you have available, you must get to know what options it makes available to you.
Read Smartphone Cameras Explained: Everything You Need to Know About the Snapper in your Smartphone (just click on the title). The article and photos will help you understand your phone camera features: megapixels, sensors, aperture, shutter speed, camera sensitivity to light (ISO), image stabilization, and high definition (HD). Examine your own device and make a list of the features it has. There will be a quiz about your device and the information in this article. Quiz Date: Group A is Thursday, April 15, 2021 Group B is Friday, April 16, 2021

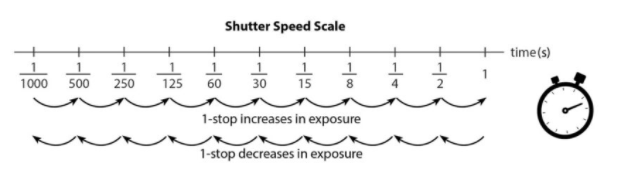
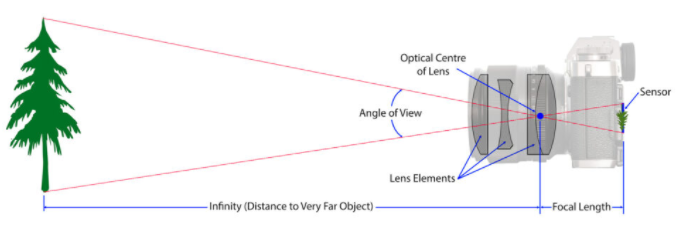
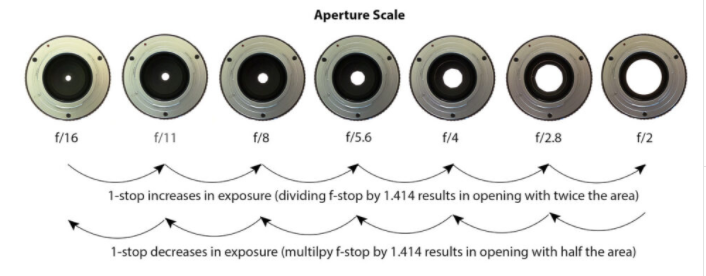
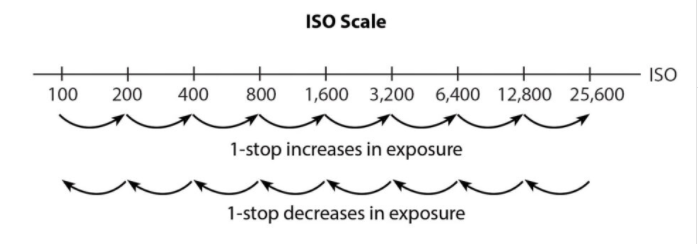
Attribution: The above images are from A Beginner's Guide to the Exposure Triangle (see the full article linked in the External Resources below).
External Resources
If you do not have access to a camera, you may use a school camera if you sign it out and bring it in every morning for a charging and check-up. You are responsible for any damage, so be careful. Here is a list of helpful guidelines.
**Module 04: Variety of ShotsPart 1Research the shots on the checklist below. On your website, make a setup like the one below for each shot in the chart. Build the chart attractively on your web site with text and images.
Each type of shot shown below must be included on the Shots web page on your website. Use the format shown above, with a spacer between each shot type.
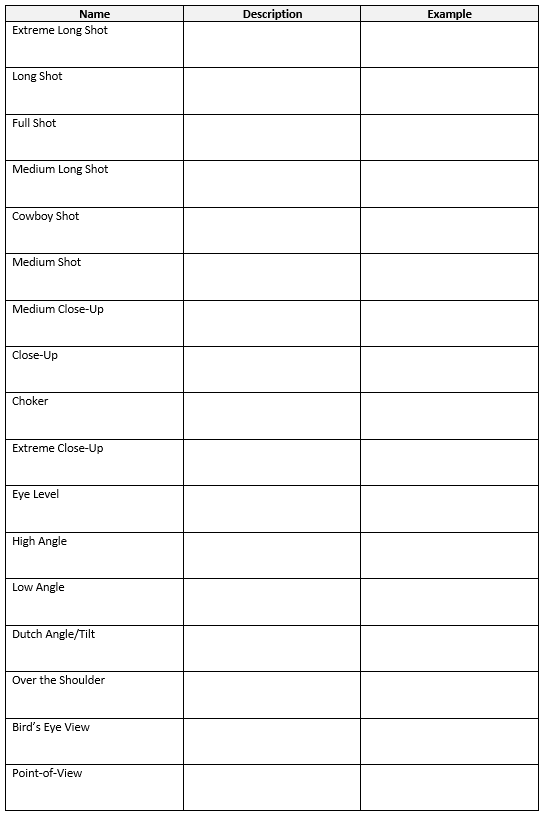
Due Date: Friday, April 16, 2021
Use the checklist provided below to help you remember the different things to consider when taking shots for your projects. You can print this file if that is helpful, or take one from the wire rack at the front of the room.
Part 2We will go out on a nature walk to take photos. Once we have done this, please post your 8 Variety of Shots sample photos in a separate section at the bottom of you "Variety of Shots" page. Be sure to label them with the type of shot that they are.
Due Date: Tuesday, April 20, 2021 Pictures of Hope AssignmentNote: Students in Photography 10 are excused from doing this assignment this term (due to the need to reduce assignments because of Covid restrictions in place).
Assessment: Here are the things that I am looking for in your photos.
**Module 05: Light & Shadow/Colour & BalanceIn this module, students will study the external resource material and experiment with light and shadow in the Green Screen Room at WHS. We will also discuss the variety of shots that you can take with your camera. This will help you as you plan your projects.
Part One - Your Own Light Shots (Spring Shots)
Assignment (for all students): Read the articles titled, "Basic Photography: Qualities of Natural Light" and "Taking Pictures of Sunsets & Sunrise" from below (in External Resources). Apply what you learn to your assignment (the final 3 will be discussed in class). You are responsible for planning and posting 8 shots:
a) a sunny scene b) a cloudy scene c) sun on a building d) light/shadow contrast e) light on a person f) warm light g) cool light h) diffuse light Due Date: Wednesday, April 21, 2021 Assessment: A checklist will be used assess whether you have submitted a good example of each along with your journal entry.
External Resources:
Basic Photography: Qualities of Natural Light Quick & Easy Three Light Portrait Set-up for Photo and Video Three-Point Lighting for Portrait Photography One Light Portrait Set-up Taking Pictures of Sunsets & Sunrise Black & White Photography Night Photography Easy Basic Photography 
Part Two - Historical PhotosNote: Students in Photography 10 are excused from doing this assignment this term (due to the need to reduce assignments because of Covid restrictions in place).
Students research historical photos or a specific photographer from prior to the year 1970. Marks are given for accuracy and proper formatting.
The presentation must include:
Due Date: TBA, 2021
Note: The assignment given for this shortened version of this assignment (2020 Fall) involves less research than the sample provided above. The expectations were well outlined in class and are clarified above.
**Module 06: Photoshop Adjustments(Learning to use Photoshop is vital to the editing process. Photoshop Pro allows you to make minute or broad adjustments that can greatly improve your photos. It is important to note, however, that photography is an art, and often they are valuable in their raw state.
If you decide to edit a photo, Photography 10 students need to know how to use adjustment tools to crop, resize, and adjust colour, brightness and contrast. Students will also learn to use tools to adjust parts of photos, repair damaged photos, and layer one image into the other. Assignment 1: (In class students only. Blended Learning Students cannot do this lesson) Review the videos from the External Resource below. Complete the 14 editing assignments found in Multimedia/Class Assignments/Photography/Photo 10/00 Introductory Photoshop These 14 edits must be posted to the Adjustments page for Photography on your website in the format shown in class.
Due Date: Friday, April 23, 2021
Assignment 2: (All students must do these lessons. Blended Learning use Gimp and tutor themselves with youtube.com videos)
Make a new section in the Adjustments web page of your website. Student will take their own photos for these adjustments. Photos will not be provided. These photos must be in the student's document files under Photography10 in either the Elements/Shots/Light&Shadow files or they can be other new photos taken since class started. They will place their raw photo and the edited photo side by side on your Adjustments page on their web site. Remember, I only want to see the edit indicated, and no additional edits. Select a suitable photo from your collection for each part of the assignment:
7. Adjust hue and saturation of colors in one of your photos using the Image hue and saturation settings as in the video called Adjust Hue and Saturation of Colors found in the Adjust the Image Quality collection of videos (see External Resources below). Place the raw photo beside the edited photo on your Adjustments web page.
8. Adjust the vibrance of a colour in a photo without changing the skin tone for the subject. Obviously, you must use a photo of someone who is wearing a brightly coloured shirt for this adjustment. 9. Use the lasso tool to select a subject to outline. Make it into a layer and place it onto another of your photos. Flatten the image and place it on your adjustments assignment page. Put the original image from which you cut beside the edited image with the description, Lasso Tool. 10. Watch all five videos found at "Using Selection Tools" in the External Resource below. Making selections using these tools allows a much easier process than using a lasso tool every time. You have several options: Quick Selection Tool and Rectangular Marquis Tool (video 1), Square, Oval, and Polygonal Selection Tools, (video 2), Combining Selections (video 3), Adding or Subtracting Part of a Selection (video 4), and Using the Magic Wand Tool (video 5). Select two of your own photos and use a selection tool of your choice to edit each photo differently (don't use the same tool to edit both). The more complex the edit, the better your mark. For each of the two photos, place a copy of the raw photo beside a copy of the edited photo on your Adjustments page on your website. Underneath the photo, write a detailed description of exactly what you did to edit the photo including the selection tool used and the kind of edit you did. Be sure to note that it is easier to use the "add adjustment layer" at the bottom of the layers panel rather than the Image/Adjustments method we have used until now.Assessment for Assignment #2: #1 - Crop - A photo is cropped to highlight a feature more prominently. What feature is highlighted through the crop you did? /1 #2 - Straighten /1 #3 - Brightness/Contrast /1 #4 - Black & White /1 #5 - Collage - 4 photos used /2 #6 - Family/friends Collage with Text - 4 photos plus text /3 #7 - Hue/Saturation /1 #8 - Vibrance /1 #9 - Lasso Image Replaced - 2 photos + transfer /3 #10 - Selection Tools (2 photos) - 2 photos/2 selection tools /4 Total Marks Possible /18 Assignment 3: Colouring Line Art (Not assigned in the spring term) You now have the opportunity to add colour to a line drawing. This sill will come in handy for adding colour to photos or posters later on. Open the assignment below. Also, open the line drawing to save in your documents/photography file so that you can bring it in to Photoshop for colouring. Follow the directions carefully, and then post it as an image on your Adjustments page of your web site (remember to save it with your name).
Due Date: Friday, April 30, 2021
**Module 07: Photoshop ManipulationAssignment #1: Using Liquify in Photoshop
Following the lesson, experiment with photos from online and your own photos to use this tool. You will be expected to post one liquified online photo (i.e. from Pixabay) and one photo of your own that are liquified. You must post these side-by-side (raw beside edited with descriptive text below) in a section labelled as Assignment #1 on the Manipulations page of your website. This is four photos in total with raw and edited.
Liquify is an ungraded assignment meant to have some fun learning how to manipulate photos in Photoshop.
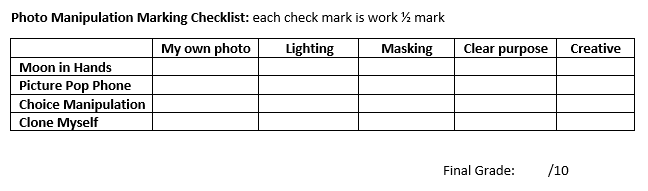
Assignment #2: Inserting a Bright Moon into a Photo
See the tutorial below. Take a photo of someone holding a portable light in the dark. Select a moon on transparent background shot from this website and save it to your photography file: http://pngimg.com/imgs/nature/moon/ In Photoshop, use the techniques in the video to replace the light with the moon. Soften the edges and bring up the brightness so that the photo looks more realistic (as real as holding the moon can be, that is). Post your image on the Manipulation page its own section. Add text to describe the process that you used to achieve the effect. Use this website to guide you through the process: Creative Manipulation Tutorial - Full Moon Assignment #3: Item Flows from Phone
Use the example video provided to create your own Phone Image Manipulation.
Skim through the video to learn how to edit using Photoshop in order to create a photo with an image that looks like it is coming out of your phone. See the Tutorials Junction video link first.
Assignment #4: Personal Choice
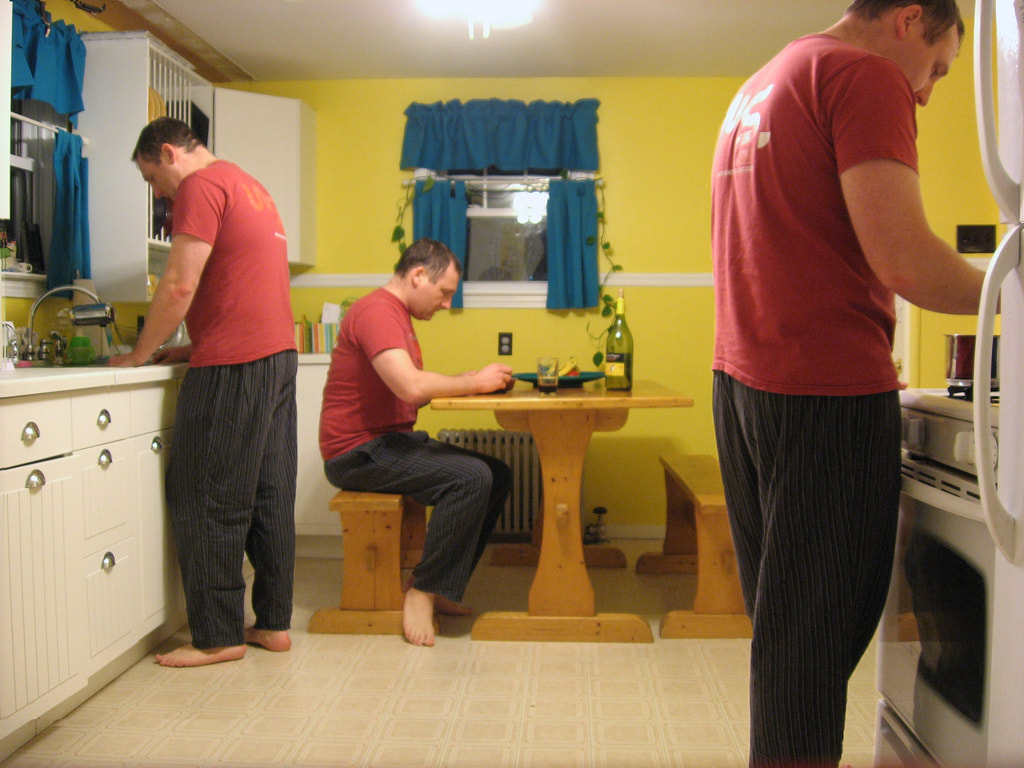
Assignment 5: Clone Myself
Check out the video that shows you how to edit a photograph so that there are several clones of you involved in various activities. Here are the assignment requirements:
Due Date: Thursday, May 6, 2021
Assessment: The following checklist will be used to ensure all the assignment expectations have been met.
Module Assessment: Please complete the following form and post it as a file titled "Module Assessment" on the Manipulation page of your web site.
**Module 08: Safe & Ethical PracticesSelf-assessment rubric to be completed prior to marking by the instructor. Students are responsible for finding out about copyright and how it affects photographers in Canada.
Assignment: There are two parts to this assignment. The first does not take long. The second involves research quite extensively. Part One Think about 5 reasonable things that you must do to keep yourself safe when you are taking photos. You are free to get ideas from online if you like. At the top of the Ethics web page, make a title that says, "Things I Must Do to Ensure My Safety When Taking Photos". Beneath this, add a text box and use bullets to list five things you must remember in order to care for your safety when you take photos. Part Two Step One Use the External Resource provided below - The Canadian Association of Professional Images Creators: the Copyright Act Learn by reviewing the article and by watching the videos. The first video is the introductory video. The three that follow are about specific kinds of situations.
Step Two Select one of the bulleted options above and create a well-researched, organized, and attractive web page on your site. It must be on the Ethics page. Be sure to include photos, charts, and graphs that would help your reader better understand what is important to know about the topic you have chosen. The text must:
Part Three Complete the self-assessment portion of the photography_10_ethics_rubric.docx below, and hand it in by the due date. Be t Due Date: Friday, April 30, 2021 Assessment: Self-assessment rubric to be completed prior to marking by the instructor.
Module 09: Project PlanningDue to Covid time limitations, we will not do this module in the spring.
For all students
Each student must select a theme for a final project and get approval from Mrs. Bitner prior to beginning to take photos. They should take a lot of photos and then choose their best 25 to include on their Final Project web page.
Students will be expected to put learning about the Elements of Photography to good use. A good variety of shots and angles will be expected. Refer back to the slideshow Mrs. Bitner taught you through in Module 2. Use the checklist below to help you ensure that you have a good variety. Use your shot variety list and assignment to plan for many different distances in shots. A well-established Project Plan must be presented to the instructor for approval.
There must be an introductory paragraph discussing the theme(s) in detail, who or what the subject(s) will be, and how light will be incorporated. The students must plan out their shots. This also includes a chart showing the following (for all 30 photos): 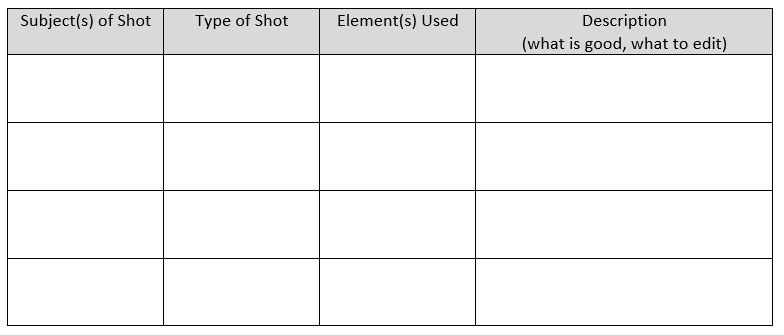
Project Plan Due Date: TBA, 2021
**Module 10: Final ProjectFor all students.
On the students Final web page, the following must be posted:
To help you adjust the photos in your final compilation, here are some valuable video lessons (provided as a review of what is done in class (click to link):
Confirmation of Choice for project: Tuesday, April 27, 2021
Raw Photos Due: Tuesday, May 4, 2021 Project Due Date: Monday, May 10, 2021 at Noon (Group A) Tuesday, May 11, 2021 at Noon (Group B) Format for Mini-presentations for Photography 10: Each Photography 10 student must present their three (3) best photos (posted at the top of the Final Project web page) and tell about the following:
Assessment of Peers (required):
Presentations: Thursday, May 13 (Group A) Friday, May 14, 2021 (Group B) 9:00 Grade 10's 10:00 Emily 11:00 Chyler *All students must attend all presentations for their group. | |||||||||||||||||||||||||||||||||||||||||||||||||||||||


