Robotics is an exciting, cutting-edge course that is a mix of electronics, mechanics, and coding. The Arduino Uno processor is used to transfer coding instructions to various devices. Following instruction and practical experience in the basic understandings, participants in this course will be working to create a device for "practical use".
It is important that you are set up to receive email via our system. Please establish your account immediately. Communicate with your teacher using this email. This website provides you with most of what you will need to complete the course. You will have your own kit that contains most of the supplies you need. Work can be done from home if you are ill and prevented from coming to school.
It is important that you are set up to receive email via our system. Please establish your account immediately. Communicate with your teacher using this email. This website provides you with most of what you will need to complete the course. You will have your own kit that contains most of the supplies you need. Work can be done from home if you are ill and prevented from coming to school.
For my classes, please check your Office 365 email on a regular basis. You go to Office 365 and access the account with your username (i.e. [email protected]) and usual password. That is where you go to see my emails (personal or group). Robotics students post assignments in Google Classroom, but use email to ask questions.
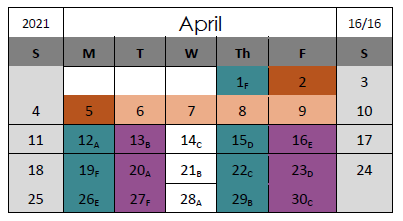
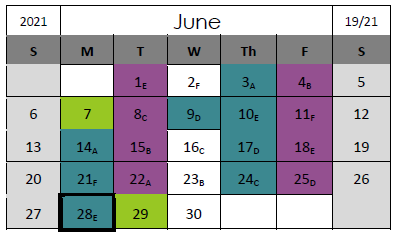
Note: This course began on Thursday, April 22, 2021 (Group A). Final Assignments are due on Thursday, June 24, 2021. Final Presentations will be given on Friday, June 25, 2021 (Group A) at 9:00 a.m. and Friday, June 25, 2021 (Group B) at 1:00 p.m.
To Prepare for Final Exam Day
- Review the material provided in the document below for the "Final Discussion" part of our course on Friday.
| robotics_10_oral_group_quiz.docx |
- You will also present your Final Project plan on Final Exam day, June 25, 2021. Practice your presentation. Do not plan to read it from the screen.
Please note that the groups are subject to change as approved by the office staff and administration. This is a multi-grade class. This means that Robotics 30 is also taught at the same time.

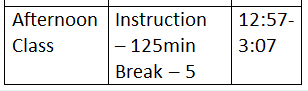
Classroom expectations: The bell schedule will be followed to observe requirements for social distancing. Attendance will be taken at the beginning of class and each hour thereafter. Please be on time. The break time will be at the discretion of your teacher, but you will have time to go to the washroom and fill up your water bottle in that time. It will be at approximately the same time each day. Use your break well so that you can stay focused in class.
|
We are still expected to cover all the material outlined in this course in the time allotted. A two-hour period requires that you are focused for two hours.
|
|
*Please note that the course has been adapted to compensate for online delivery and may not be exactly as shown on the course outline.
| ||
In each of the modules below, you will see icons to indicate assignment instructions for students in class, and assignments provided for students who are ill. If you are at home with the sniffles or required to self-isolate, look for the little blue alien to know what you must do to keep up.

At school: This robot is close enough to pick up the vocal signals sent by the instructor.
|

At home: This robot is distant due to illness. Work must be done from home for a short time.
|
|
M01: Introduction
M02: Careers in Robotics M03: Safety M04: Electronics Basics/Schematics M05: Arduino/Flow Charts/Coding M06: Control Structures/Data/Functions M07: Build your own Project M08: Final Project 
Start planning your final project early to be ready for the Piranha Pond.

Collect Piranha Pond cash to be the "big fish in the pond" investor on
show day. Details in class. |
Module 01: IntroductionCurriculum Outcome: ROBA2 History of Robotics (Core)
Investigate the historical development of robotics and autonomous technologies. 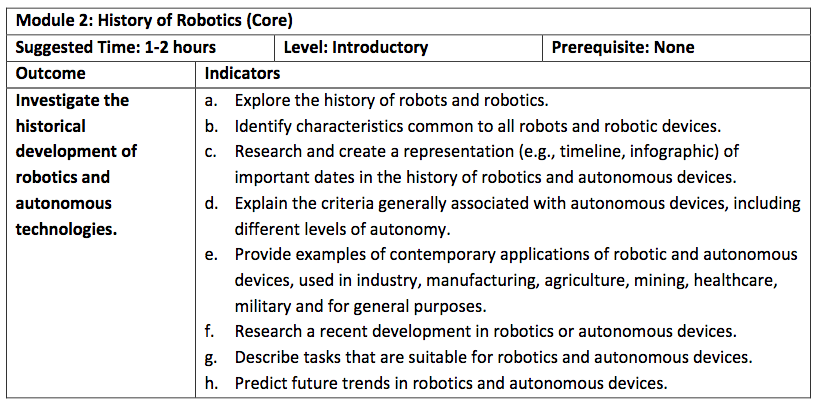
The history of robotics is explored through an instructor prepared slideshow, and students participate in discussions about the types of robots that exist currently. Finally, the students explore various applications of robotics as a lead-in to Career Research.

In Google Classroom, there is a Google Docs assignment that asks you to contribute ideas in a brainstorming session.
Assessment: This is an introductory module that encourages exploration and discussion about robots and their place in our world. It leads into the next module where students explore personal interests in this vast field. No marks are associated with this module. The research component is included in the Module 2 assignment.
Module 02: Careers in RoboticsCurriculum Outcome: Careers in Robotics/Automation A (Core)
Explore robotics and automation career paths in Saskatchewan, Canada and the world. 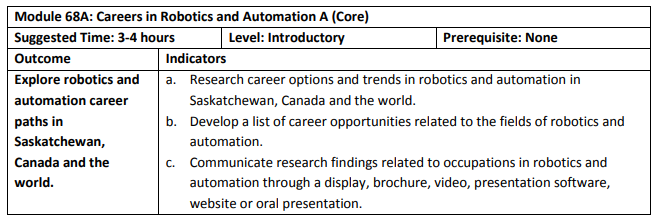
Refer to the links below to begin exploration of a field of robotics that is of interest to you. Look at the "Careers in Robotics Selection Page" link below and decide which area you would like to research. This link should be your starting point, not your only source of information.
External Links:
Careers in Robotics Selection Page Introduction to Robotics Big Dog Military Robot Innovations Assignment #1:
Students will research a career in robotics and prepare a PowerPoint presentation to share with their peers. Go to the Office 365 to choose the PowerPoint icon. Save your slideshow regularly in a folder you make called Robotics 10. From the robotics application document, students will select a field of interest to them.
The PowerPoint must have a title page with the title of the robot application selected and the student's name displayed. The second page must provide details about the job of a person who selects this field of work.
The student will then do significant online research about 8 different types of robots within the chosen application. On each of the eight additional pages there must be:
Due Date: Tuesday, May 4, 2021 Assessment: This assignment will be marked according to the parameters set out above. Accuracy and evidence of significant research is very important. Plagiarism will result in a mark of zero for the whole project. If you need help learning to write in your own words, consult with the instructor.
Additional Research: Being Business Savvy
For those of you who require more information as determined by the instructor. Use the articles listed here to write a paper, in your own words, about the importance of the following attitudes in the classroom and the workplace. There must be a clear and concise paragraph on each of the following:
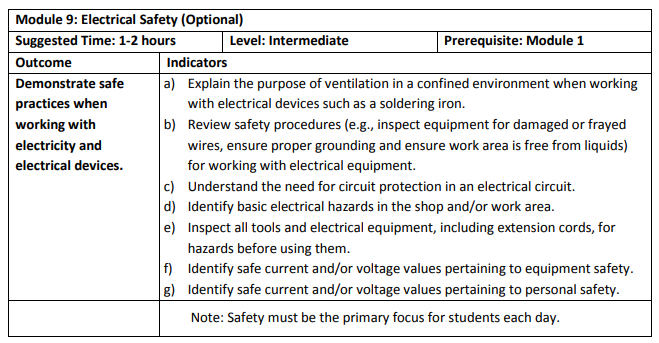
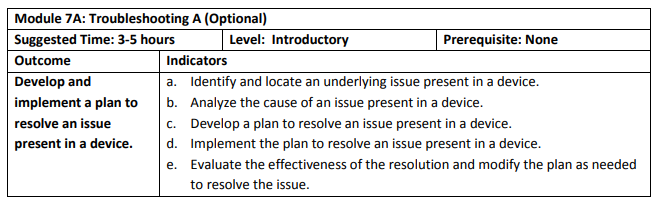
External Resources: Five Attitudes that are Important in Workplaces Dealing with Workplace Defiance Top 10 Values that Employers Look For Module 03: SafetyCurriculum Outcomes: ROBA1 General Safety (Core)
Apply principles and techniques for injury prevention to ensure safe work area. ROBA9 Electrical Safety (Optional) Demonstrate safe practices when working with electricity and electrical devices. 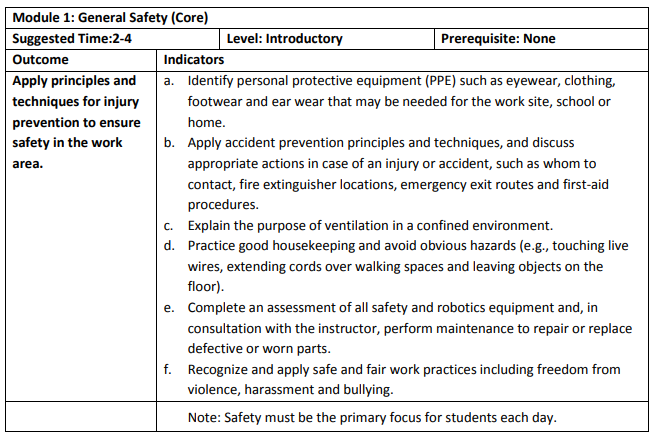
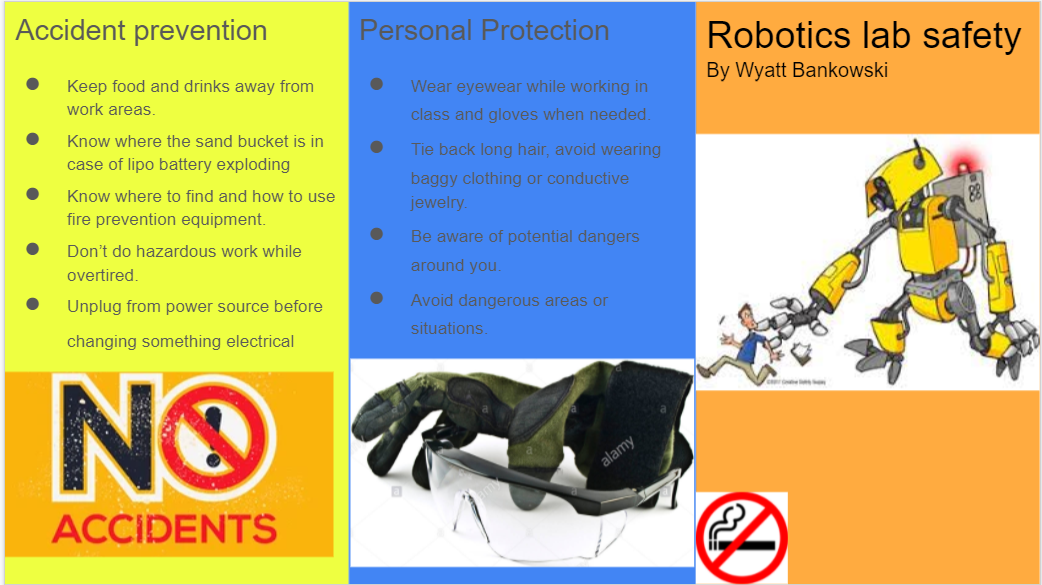
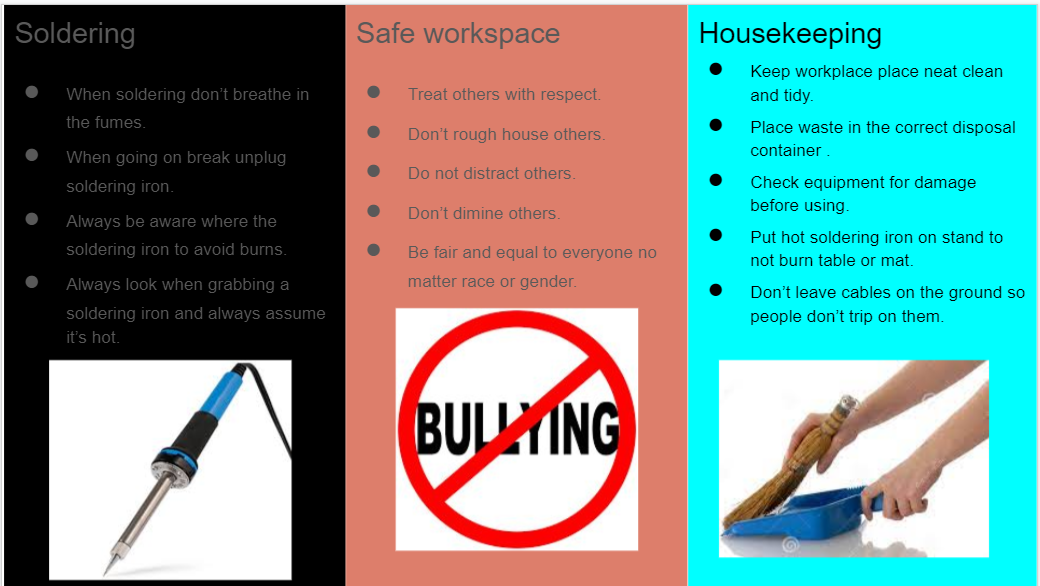
Class discussion and research: In our Wednesday online class, Lewis led us in a discussion to brainstorm safety precautions for a robotics lab. The file below contains the list of our ideas. Your job is to put the ideas into categories and then to make a brochure showing Lab Safety Rules. See the Student Exemplar below if you are visual and need to see what the brochure looks like.
Assignment: Make a Safety Brochure
You will have a list of rules after our discussion in class. You must put these rules into categories in a Google Slides (pwo page) brochure format. It will automatically save into Google Drive. See the rubric posted there for marking to be sure you have everything. Be sure that your brochure includes:
To submit your assignment, go into the Google Classroom assignment, choose your finished assignment from Google Drive, and submit the assignment.
Student Exemplar (Thanks Wyatt)
Due Date: Tuesday, May 11, 2021
Module 04: Electronics Basics/SchematicsSnapino Introduction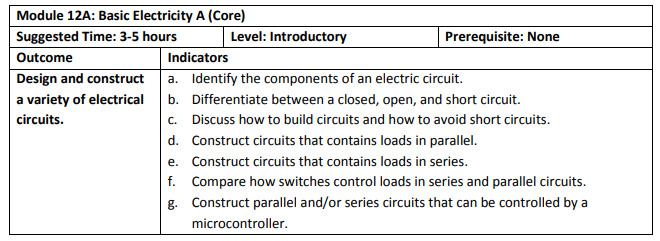
Let's have some fun.
Go to the computer index and find Media Drive/Class Assignments/Snapino/ There you will find a copy of the manual and all the programs you will need. If you have a complete kit, the manual is enclosed.
Snapino Assignments Completion Date: May 4, 2021
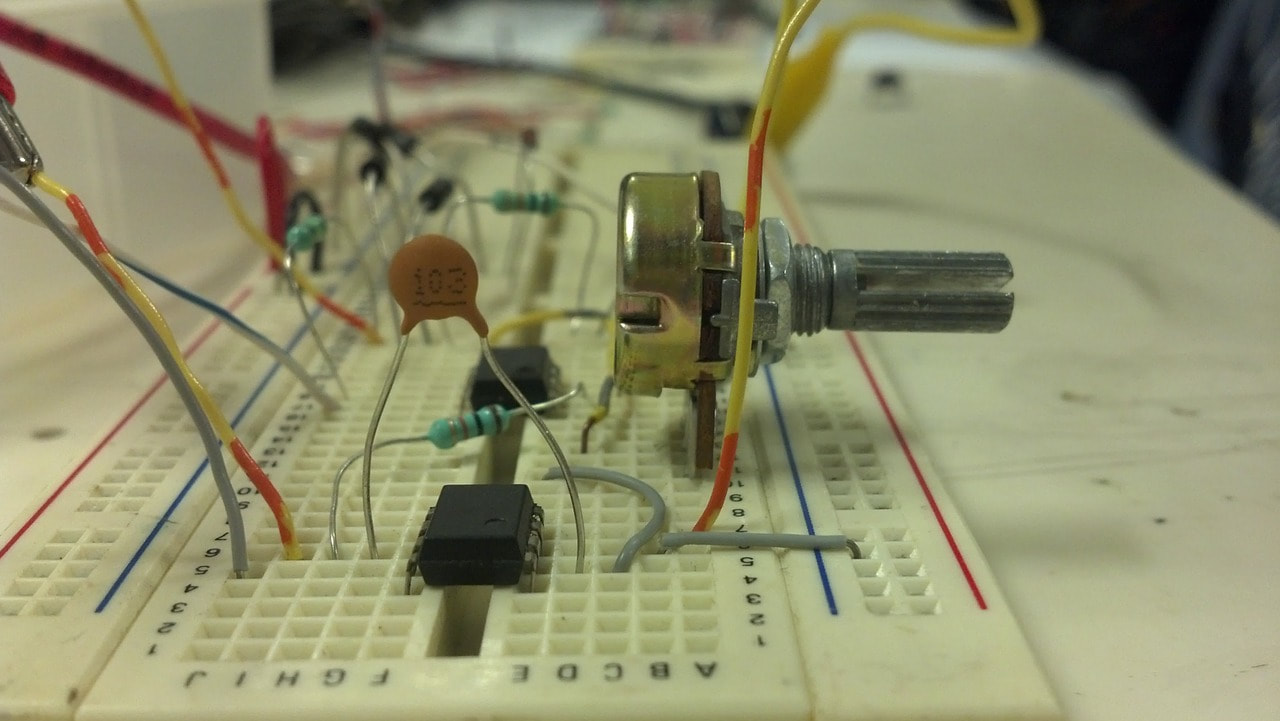
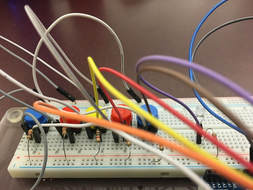
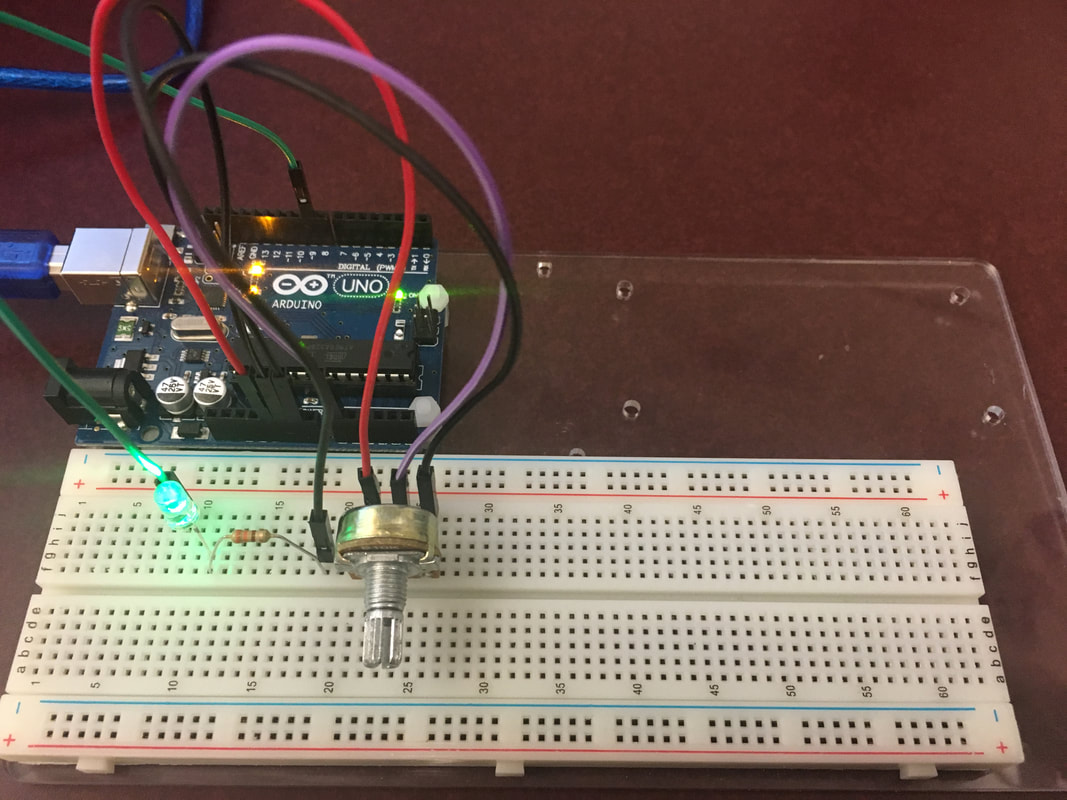
Solderless Breadboards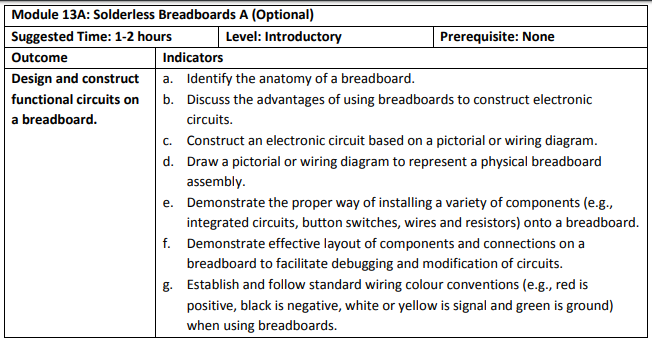
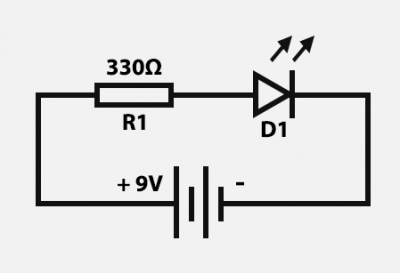
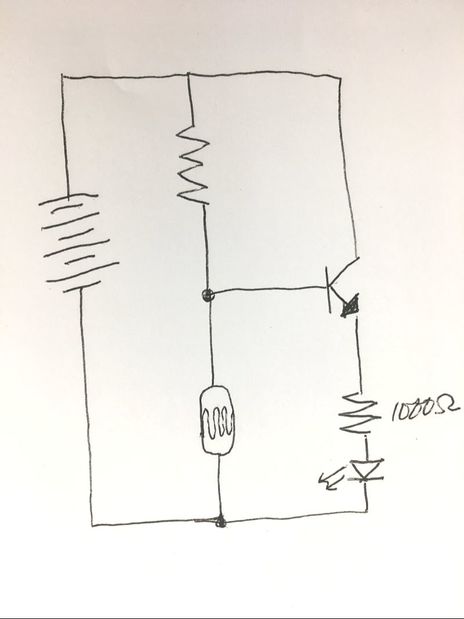
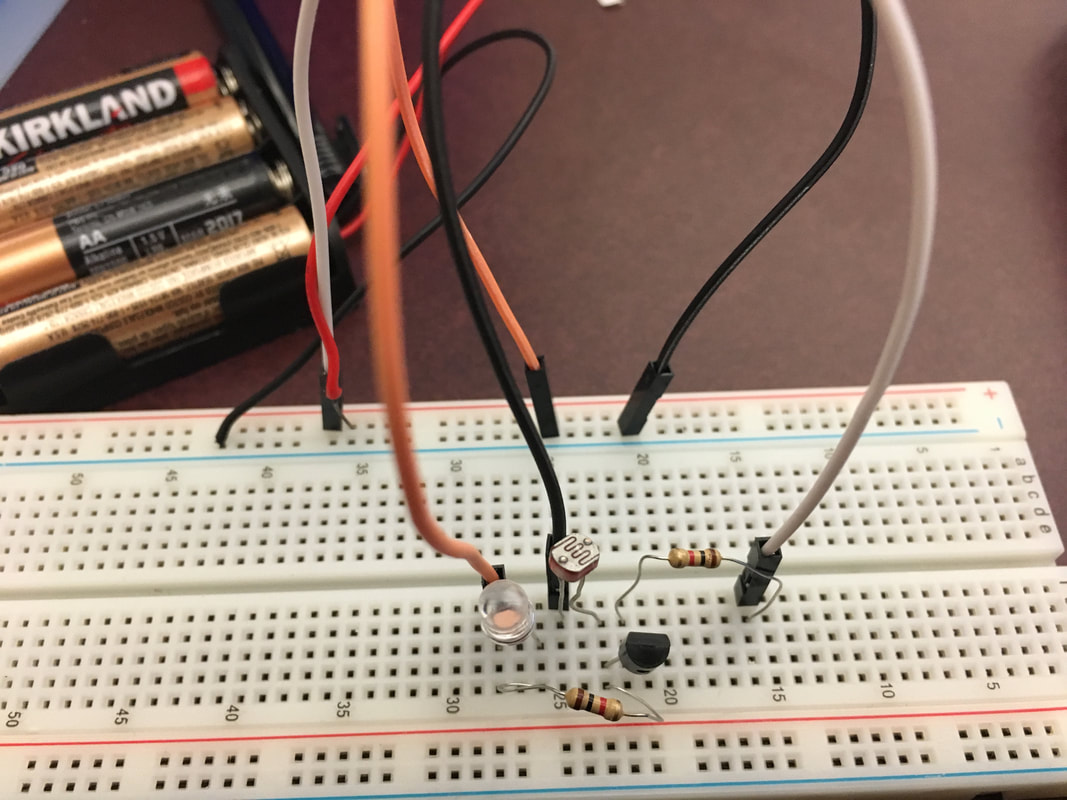
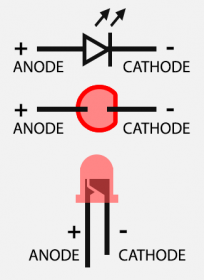
Use the schematic below to make a parallel circuit that causes the LED to come on at full light when it is in a dark room (like a night light on a sensor). Try not to study the picture on the right. Rather, make the circuit using the schematic (note that I added the photo at the end of the period).
Check out the resources below for further information. The sites will help you understand the basics of circuits.
External Resources:
Website with basic electronic symbols explained Basic Electronic Components Learning Electronics Lessons and practical experience in class will help prepare students for a quiz about electronic schematics and symbols. Some documents to help study in preparation for the quiz are below.
Study this:
Quiz Date: Group B - Quiz on Tuesday, May 25
Group A - Quiz on Thursday, May 27
External Resources
What is electricity? (article) Basic Electricity and Ohm's Law (video) How to Use Ohm's Law Schematics Resistors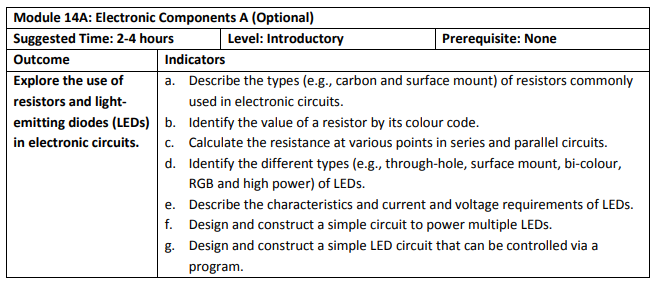
Resistors: The job of a resistor is to restrict the flow of electrons in a circuit, thereby reducing the current or voltage by converting electrical energy to heat. They come in a variety of sizes and shapes depending on the amount of current that can pass through them. You can see samples of different kinds of resistors below. It is important to understand and be able to use Ohm's Law to calculate the amount of resistance that must be applied to maintain the integrity of a circuit (so things don't blow up). Our equipment budget is limited, so preservation (and of course, safety) is vital.

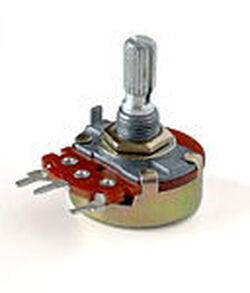
Variable resistors (also known as potentiometers) are controlled with a dial so that the amount of resistance can be changed when the dial is turned. You have a potentiometer on the radio volume dial in your car.
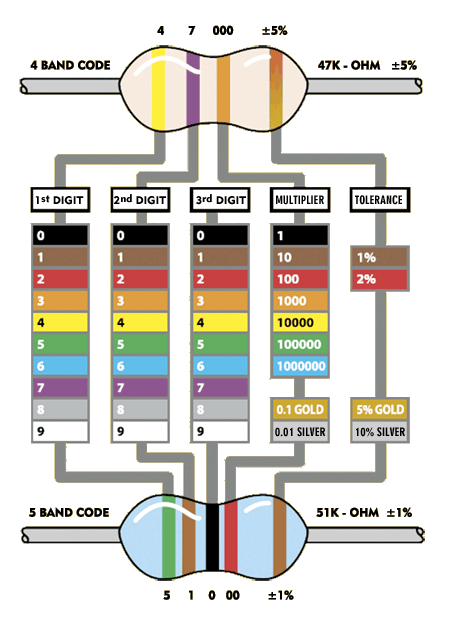
Retrieved from http://www.flradiodoc.com/images/resistor-color-coding.png www.flradiodoc.com/radio-resources/fl-radio-doc-resources.html
Use the chart above to determine the number of Ohms for each resistor. Then check your work by going to the online calculator below to check your accuracy.
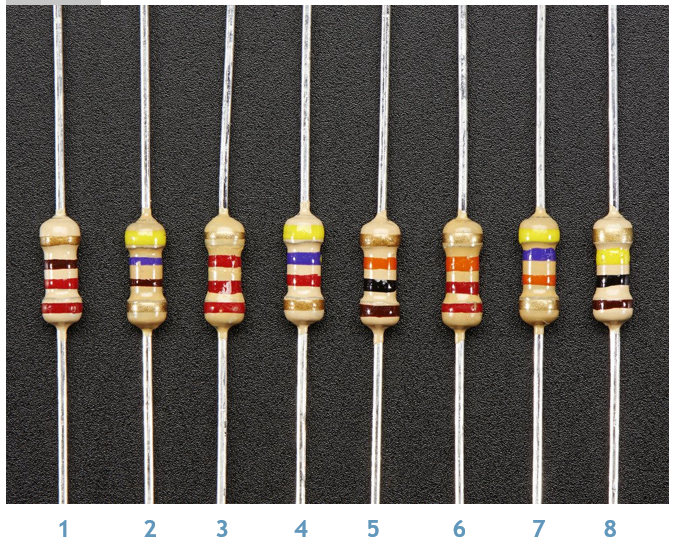
Assignment: Calculate the number of ohms represented by each of these resistors. Note that they are not all facing in the same direction (hint: gold is the tolerance level of each). On a piece of looseleaf write the numbers 1 - 8. Beside each, write the number of ohms and the symbol for ohms.
Quiz Date: Group B - Quiz on Tuesday, May 25 Group A - Quiz on Thursday, May 27 Using a Multimeter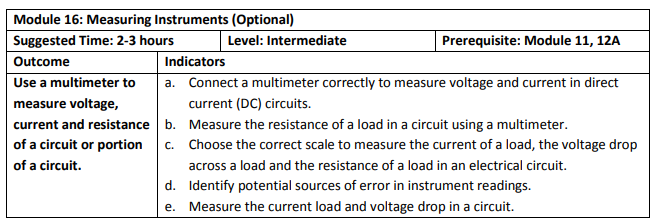
A multimeter is used to diagnose circuits, learn about the electronic design, and test batteries. It is very helpful when planning a circuit design. It is important that you never create a short circuit or overload a circuit. The multimeter helps you analyze the current, measure voltage and voltage change through devices such as resistors.
Assignment: Create a variety of circuits (for the Genius projects below). Experiment with the multimeter to see the way that the current moves through the circuit and measure the voltage.
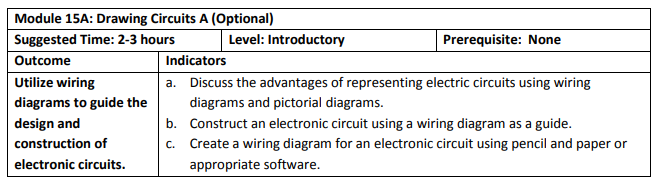
Breadboard AssignmentAssignment:
Students will be expected to create schematics using the correct symbols and then make a corresponding electric circuit for each. Use the checklist chart provided below to keep track of your progress. Your instructor must initial each circuit as you complete it. Be sure to have your schematic drawing handy for each circuit.
Due Date: Friday, June 4, 2021
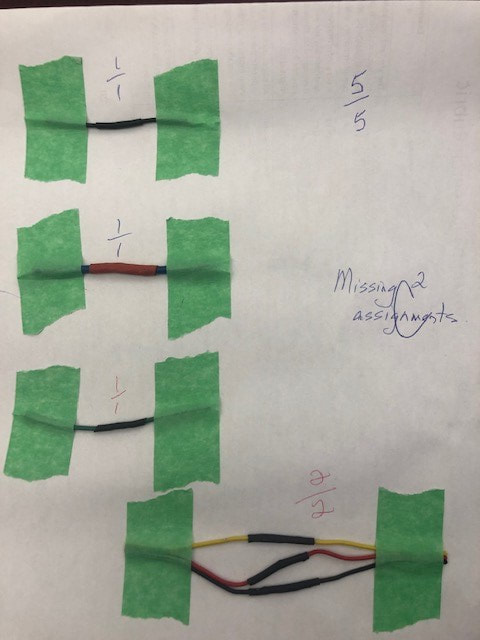
Soldering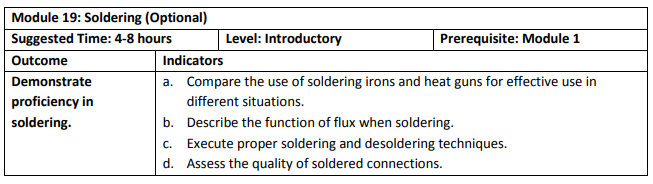

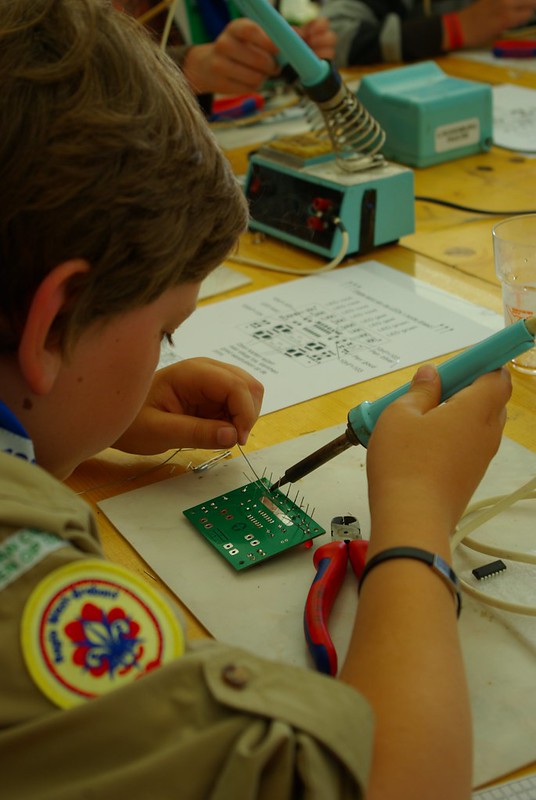
It is important to set up your soldering tools and keep them organized during working time and also to keep the area tidy for other students.
Safety: Watch the videos to see how soldering is done and to understand the terms. You will be doing some simple projects to develop the skills. In the photo, safety glasses are not shown, but it is required that you wear them every time you are soldering and working with wire or electrical components. Also note that schools only use lead-free rosen core solder. Be careful not to inhale fumes as you work, even so.
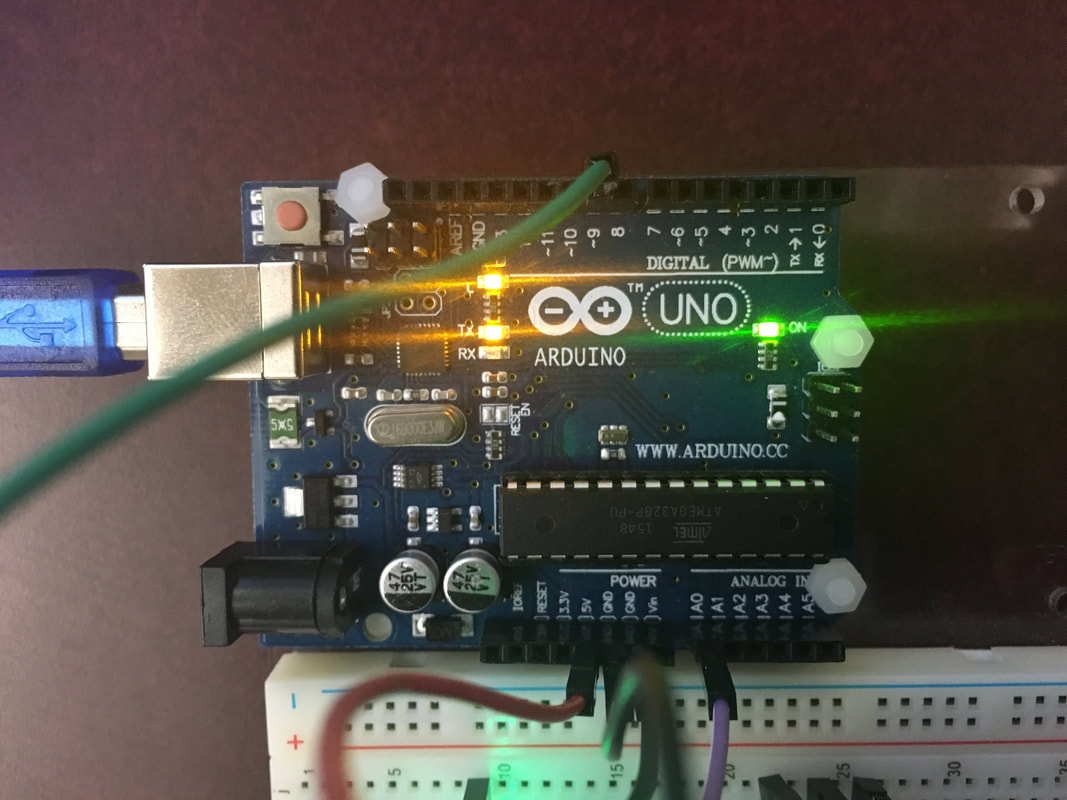
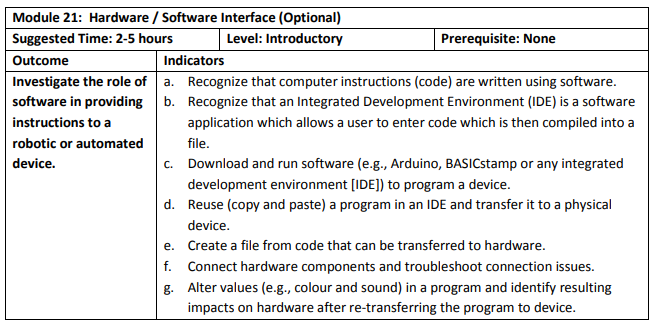
Module 05:Arduino/Flow Charts/Coding/FunctionsArduino Software and Hardware
Variables
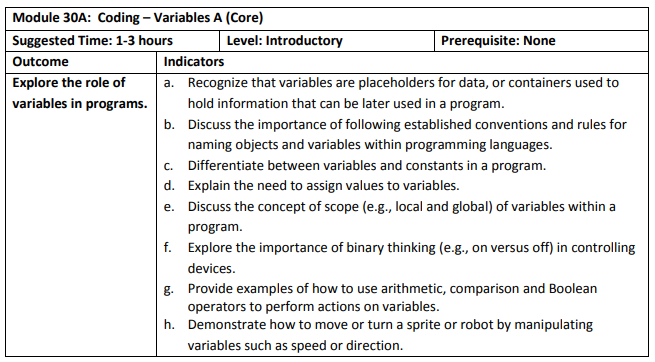
Variables
Global variables apply to all the code in a sketch. They are not placed inside a function, but can be accessed by any function. Local variables are declared inside a function, and do not apply to other functions within the code. The scope of a variable refers to where the variable is located inside the code and thereby indicates how it is accessible. 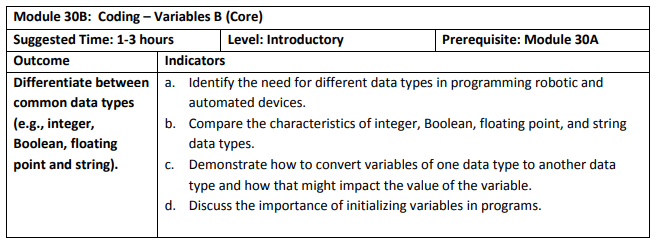
Data Types
In computer coding, there are five data types a programmer may use. integer: a number that may or may not include a negative value. character: a unit of information in its smallest form (i.e. a letter). Boolean: has one of two possible values (often true or false). It is associated with conditional statements each of which determines a particular action (if true, this happens; if false, that happens). floating point: a formula-type representation of real numbers. string: a sequence of characters (often used with arrays, discussed later). 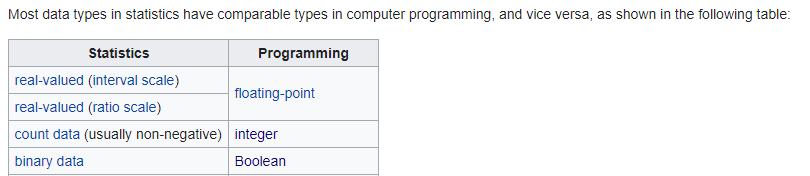
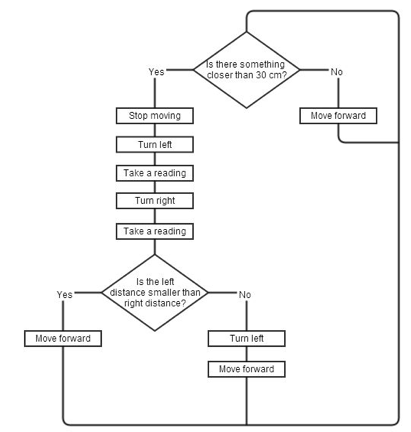
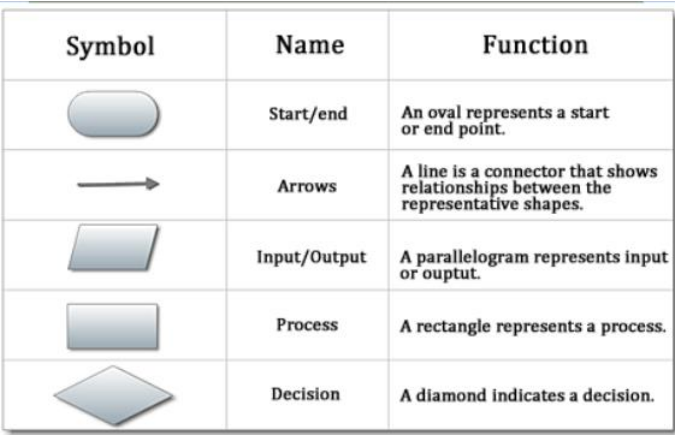
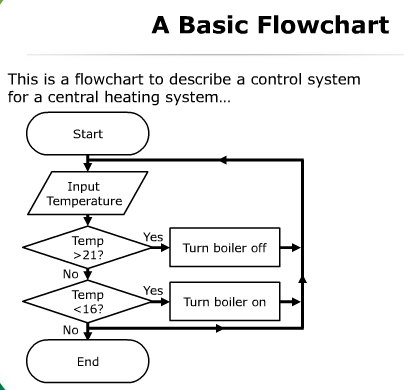
Flow ChartsFlow charts are extremely valuable when considering the logic of programming with Arduino Uno. In this lesson, students will receive basic instruction regarding Arduino Uno coding as it relates to the task to be accomplished by using flow charts to plot the course. Basic coding and Arduino Uno equipment/processes will allow the students to see results through experimentation.
Several valuable resources are included below. It is expected that students have reviewed the resources and that these will become reference materials for future lessons.
Assignment:
Due date: Friday, June 18, 2021
Take the Memory Game challenge. Watch the videos. Check out the "Arduino Simple Memory Game" link in External Resources for electronics and code.
Liam demonstrates how to play the Memory Game. He was the first to complete the challenge in Q4! Congratulations, Liam!
External Resources
Want to Sign up for Free Arduino access at home? Introduction to Arduino: A Piece of Cake Arduino Simple Memory Game Module 06: Control Structures/Data/FunctionsIn this unit, we learn control statements such as if/else, for, and while. We also study how to make digital controls behave like analog with an understanding of Pulse Width Modulation (PWM).
1Operators Quiz
In order to understand how control structures work, it is important to know the symbols that you will regularly use. Study for this Quiz Quiz Date: Monday/Tuesday, June 14/15, 2021 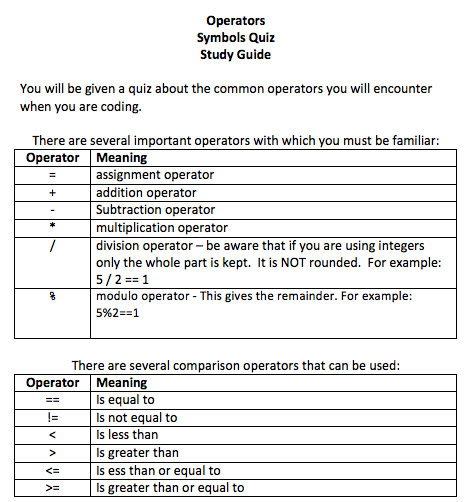
The quiz provided here can only be opened and completed once. It will be done in class on the date specified. Be sure that you have studied the guide well before you start the quiz. The study material must not be visible during the quiz. The program will give you your mark once you submit the quiz. All the best! Here is the link:
Operators Symbols Quiz https://forms.office.com/Pages/ResponsePage.aspx?id=2IpnhO7iQEaxwQ3qjs0MKF7n0NwBZfhOp3QIXngHTnJURUs1TjBGRzlPSDdXS0lMSDZRTVFCNEdOMC4u If StatementsRefer to the external resource below, p. 17, to learn about If Statements. Make sure you understand how these would work in Arduino code. You can certainly research other sources to help you understand this better if you have need to assist you with understanding.
External Resources
Introduction to Arduino: A Piece of Cake Assignment 1:
Work with your Arduino kit to create code to turn on an LED with a decreasing delay. Refer to the "Piece of Cake" manual (Paul Smith) for the code (p. 17-20). For this assignment, you must provide your teacher with evidence of your learning:
Else Statements
For this assignment, please refer to p. 20 of Introduction to Arduino: A Piece of Cake (from External Resources above or the binders in the lab), Lesson 2.3. Assignment 2:
Work to create code to turn on an LED with a decreasing delay and an else statement. Refer to the "Piece of Cake" manual (Paul Smith) for the code (p. 20-21).
Assignment 3:
3. Write your own code and comments to make this program. Be sure that you have properly saved and described it with comments. 4. Show your instructor your working electronics and Arduino Uno program. External Resources: If/Else Statements While LoopsWhile Loops will loop a code repeatedly until what is in parenthesis () becomes false. Usually, this means that there is data coming from a sensor (external source) or from an incremented or decremented variable (i.e. x++ or x--) within or code (internal source). See page 21& 22 (Lesson 2.4) in Introduction to Arduino: A Piece of Cake (external link above or binders in the lab).
Assignment 4: While Loops Use the sample code and electronics (provided below) to set up and run the While Loop sketch. Surprise! You can copy/paste the code this time. Show your instructor when done.
External Resource: Arduino While Loops Arduino While Loop - Sample (this one gives you code to copy/paste - go ahead) 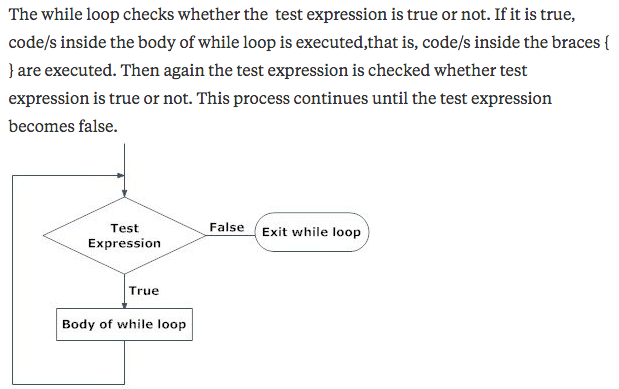
Assignment 5:
Once your teacher has shown you how to use SerialPrint, add it to your Assignment 1 code and run your electronics again. Watch the code as it is executed by your program. In digital mode, you will see lots of 1s and 0s, but this will all change when we learn about Analog inputs and outputs.
Pulse Width Modulation - Lesson
We learn about Analog functions and Pulse Width Modulation (PWM). PWM allows for digital methods to be used to get analog results. In order to accomplish this, square waves are used. The signal is switched quickly between on and off creating these square wave. The amount of time that the pulse is on is called the Duty Cycle and creates the pulse width. The truth is that the circuit is still getting a full 5V or 0V, but it happens so quickly that the eye sees it as dimmer than full brightness. If you change that amount of pulse width, you can make the light seem brighter or dimmer.
Study the diagrams below:
Attribution: By The arduino.cc team (http://arduino.cc/it/Tutorial/PWM) [CC BY-SA 3.0 (https://creativecommons.org/licenses/by-sa/3.0)], via Wikimedia Commons Retrieved from commons.wikimedia.org/wiki/File%3APwm_5steps.gif
You will notice that a 100% Duty Cycle is written as analogWrite(255). That is because analog has a range of 0-255. So if you want to indicate a 50% Duty Cycle, you would need to write it as analogWrite(128). We will discuss this more later.
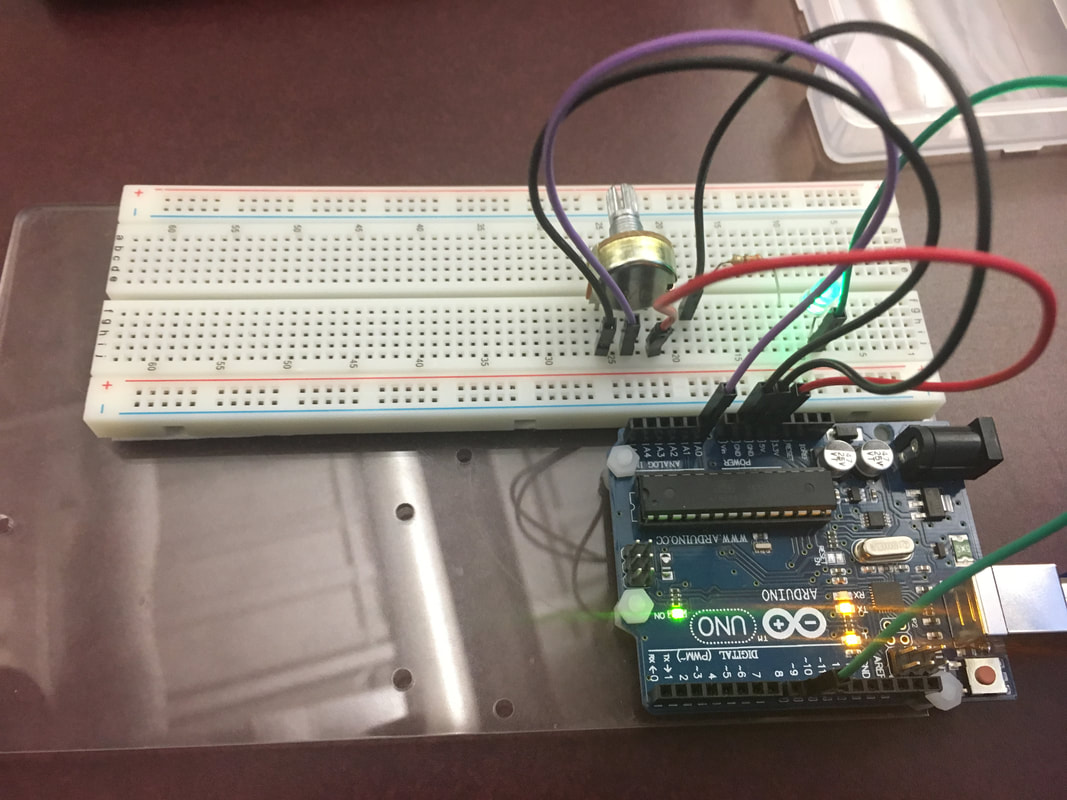
Assignment 6: Coding for Analog In and Out with Serial Print
Supplies needed:
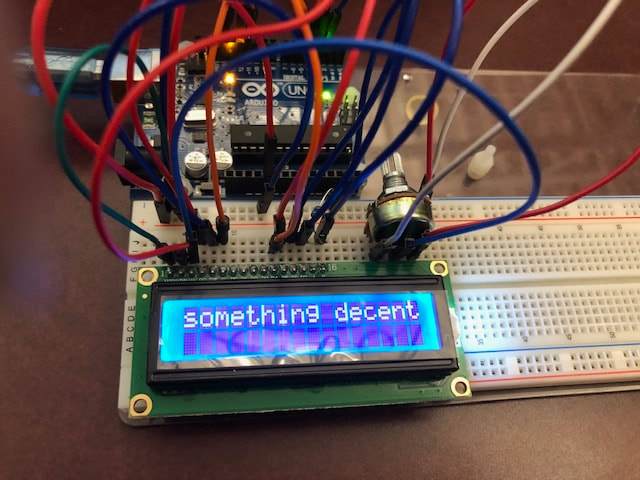
You will be typing code (not copying/pasting) to allow you to watch the Serial print-out as you adjust the potentiometer to make the light brighter and dimmer. This visual, read at 9600 bits with a 1ms delay allows you to watch the change that occurs as you make physical adjustments to the circuit.
The code you need is attached below. Be sure to type it yourself since this gets you accustomed to finding errors in your code. Remember that learning occurs best when there is chaos (trial and error).
Attribution: Arduino is a wonderful company that allows open access to their Sketch software. They allow others to share sketches they have made. Credit for this sketch goes to Tom Igoe. Thanks a million for sharing!
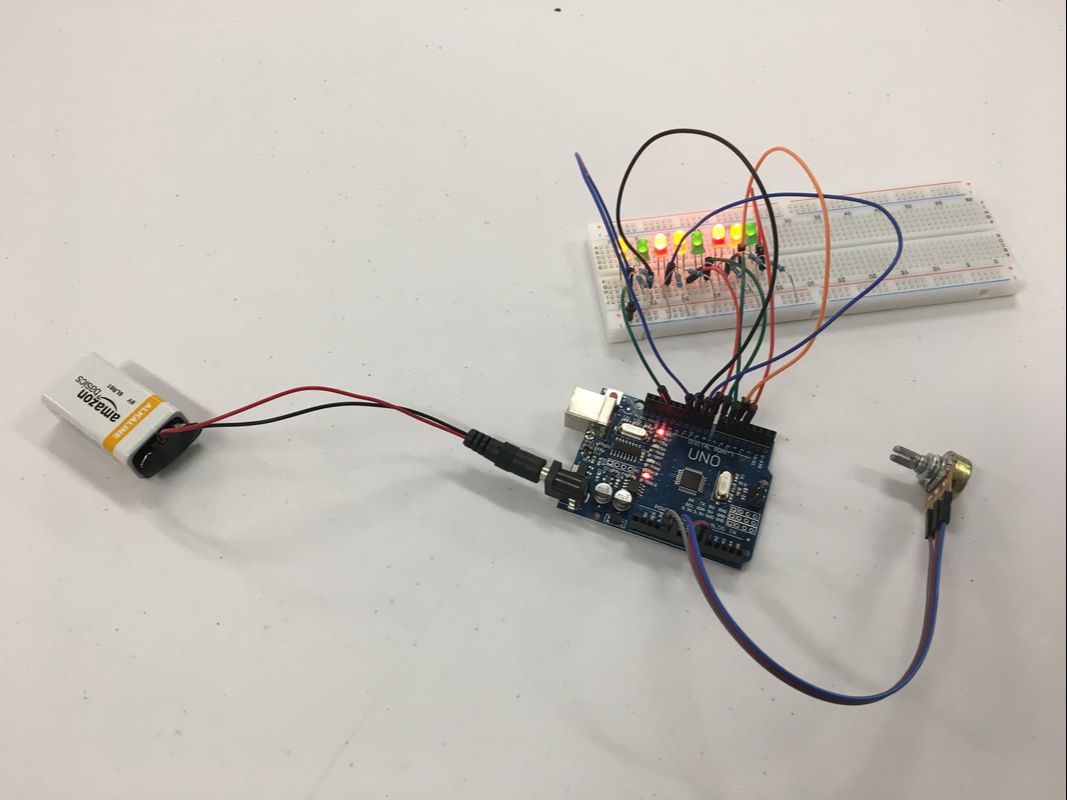
For LoopsAssignment 7: For Loops
Read the article listed below in External Resources. In the lesson, you will learn more about the for loop. It is used for a repeated operation. Notice the three elements inside the brackets: initialization, condition, and increment. Read carefully for understanding. Set up a circuit and coding according to instructions in the external resource. Remember that the Pulse Wave Modulation maximum value is 255. External Resources: Arduino For Statements FunctionsFunctions
By establishing functions as separate sections of code, the programmer can pull in the function with function name and does not have to write out all the code associated with that function. For example, if the programmer wants a car to move forward, turn right, move forward, turn left, move forward . . . s/he does not want to type in all the code to move forward over and over again. She/he can write a void function () that moves the car forward and then just type Assignment 7: Functions
Mrs. Bitner's While Loop Challenge
Congratulations to Isaiah M for completing this challenge in record time. Wow! The video will be posted when Weebly is working properly.
Module 07: Build your own Project
Students work to create an Arduino device of their choosing. They may use a project found in one of Mrs. Bitner's books, online, or from the SaskCode projects below. Students are encouraged to choose a project that is not too complex. Save these projects for the Final Project individual assignment below.
SaskCode set up a variety of challenges for you to try. I apologize for the poor quality of the audio as this was a busy conference.
Due Date: Presentations on TBA , 2021
Module 08: Final ProjectDue to time constraints regarding the course formal project will not happen. We have revised the final to be a project plan and a marked discussion. Attend online class on Wednesday, June 16 for more details.

Welcome to the Piranha Pond! You have worked hard to get to this point. Now it is time to see what you can do. You will find a project of interest to you and present it to the Piranha Pond investors (your classmates). You have been saving Piranha Pond dollars to invest in the inventions of your peers. More information to come.
The Final Project takes the place of a final exam. It must be completed in order for a pass to be given for the class.
Students will complete an individual project of their own choosing. Mrs. Bitner will support the learning by ordering required pieces. This must be done as soon as possible to ensure arrival prior to presentations. Students are expected to do at least one project selected to fit in to the following categories: (see below for sample suggested projects)
More information to follow.
External Resources: (Here are some places to find ideas, but not all are good)
Assignment Due: Thursday, June 24, 2021 2021
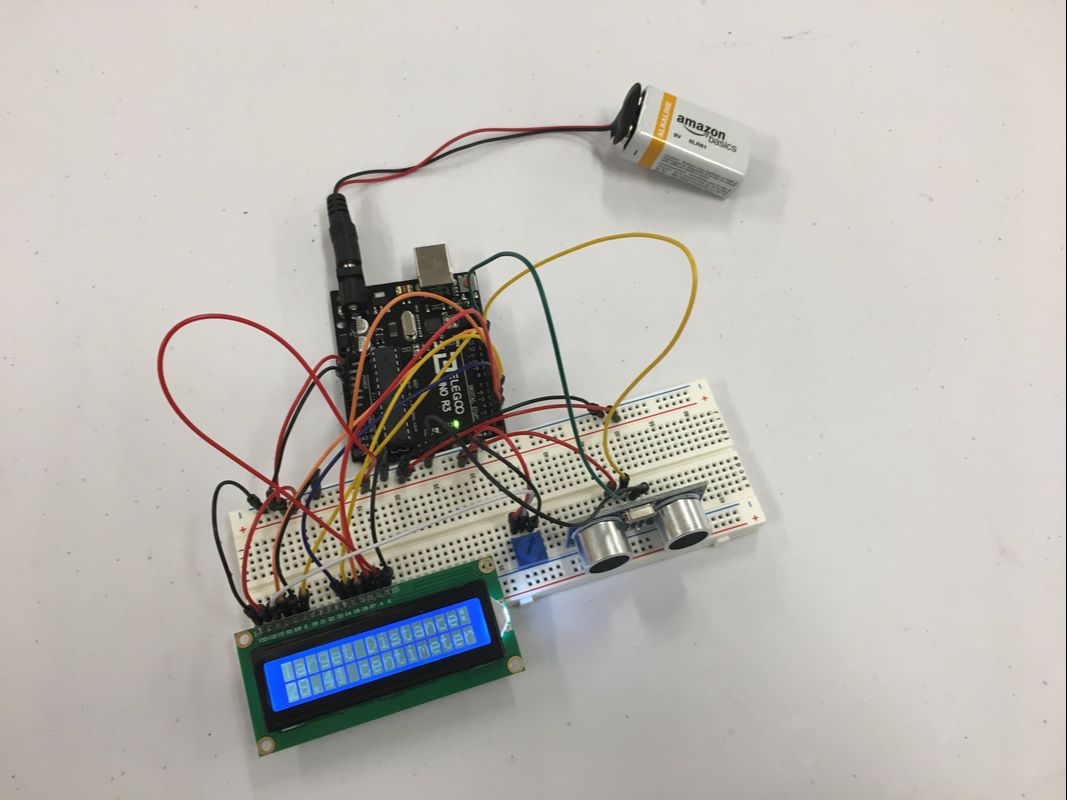
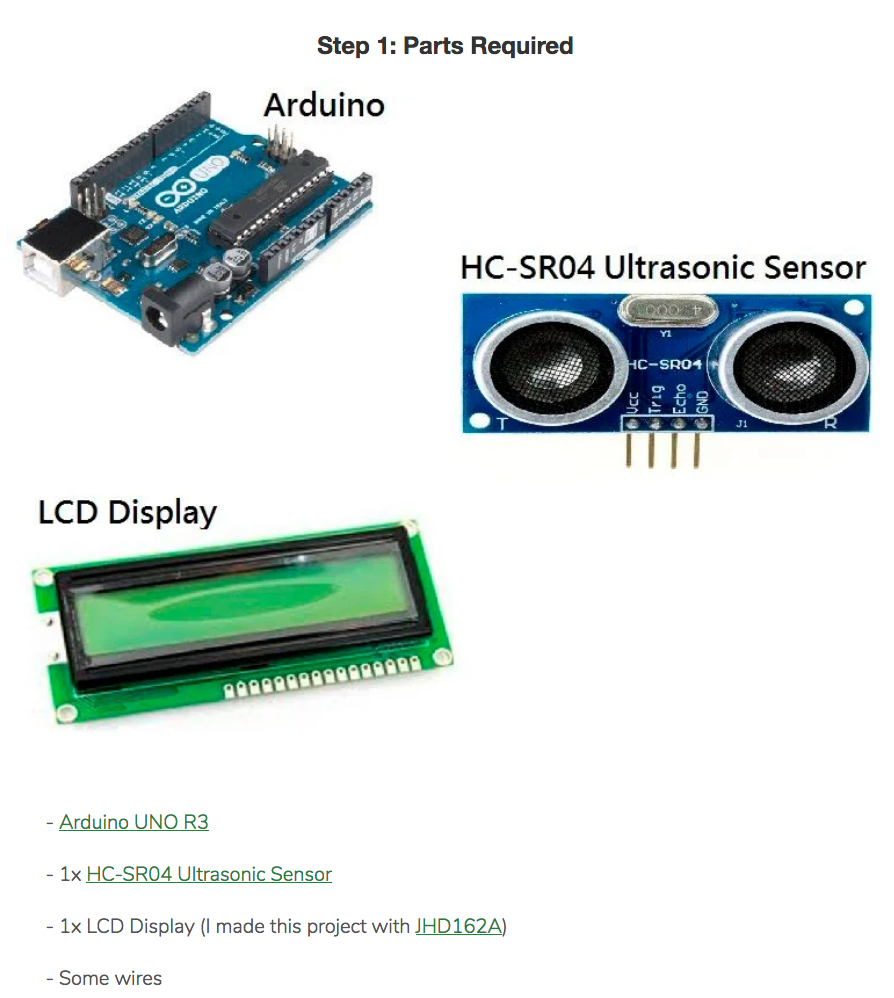
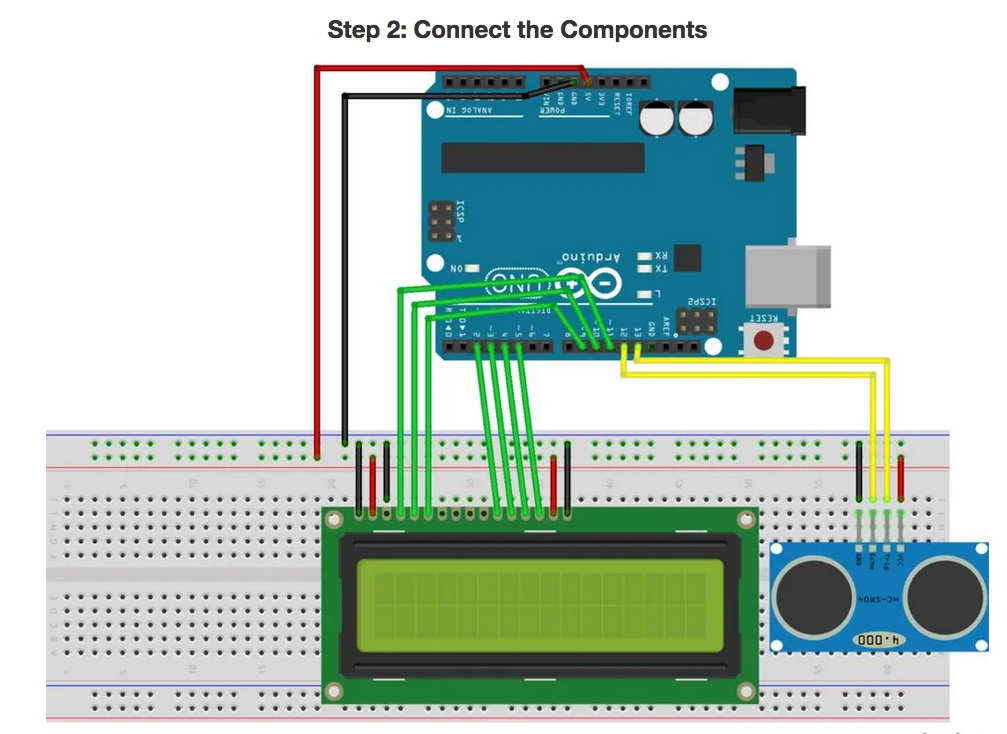
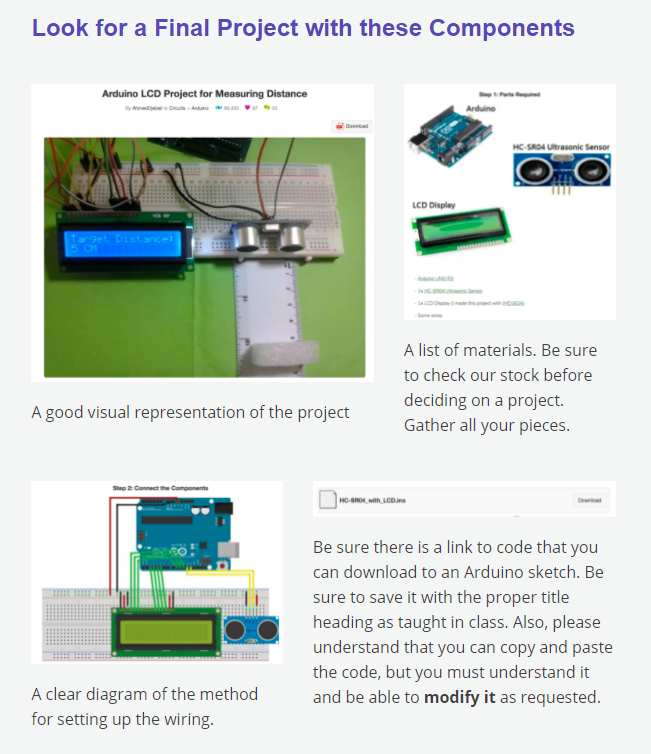
Presentations: Friday, June 25, 2021 Group A @ 9:00 a.m. Group B @ 1:00 p.m. Note: Attendance at all presentations is a mandatory part of the class. Students will be completing peer assessment documents associated with each project. Unfortunately, we cannot invite guests to participate at this time. Students are welcome to video record their presentations to share with their families. Look for a Final Project with these Components
Sample ProjectsReview the samples below to help you choose a project of interest to you. Be sure that you select a project at the beginner/intermediate level since we have not covered concepts such as "arrays". Look for a project that gives you everything you need.
Sample Projects
Assessment: A rubric will be used to assess the final project.
See Google Classroom - Final Project to view the rubric used to assess this project.
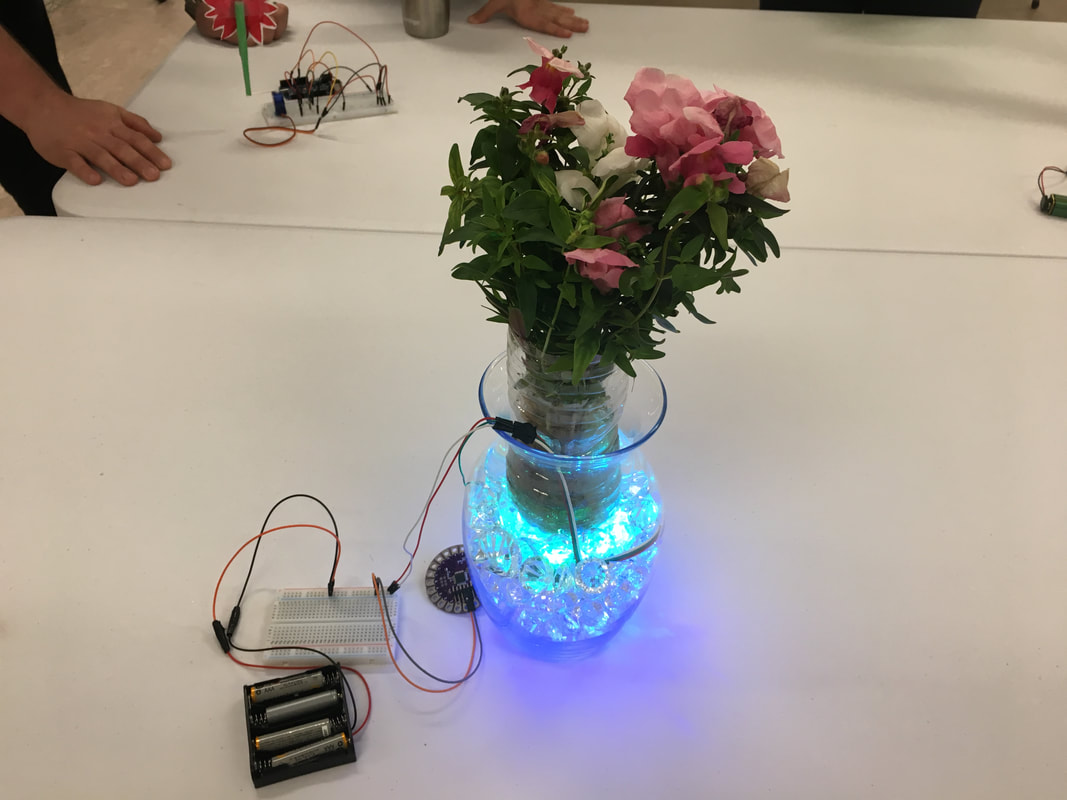
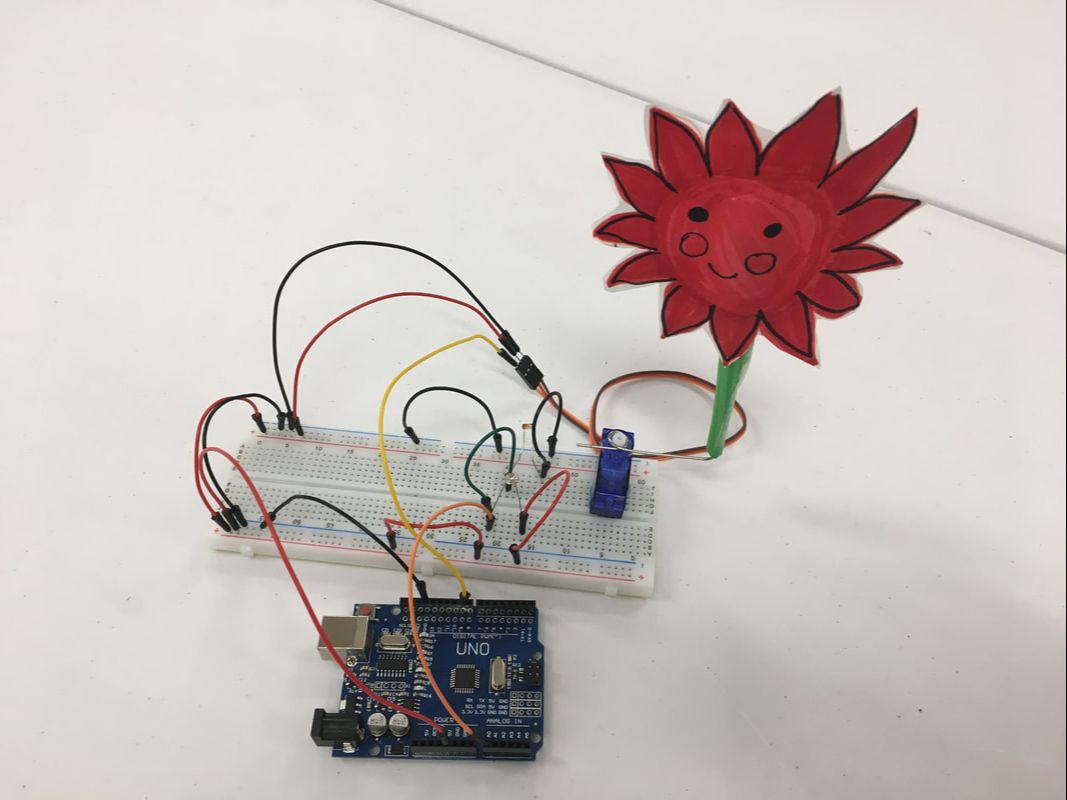
Celebrate these Amazing Final Projects
| |||||||||||||||||||||||||||||||||||||||||||||||||||||||||||||||||||||||||||||||||||||||||||||||||||||||||||||||||||||||||||||||||||||||||