Robotics 20
Robotics is an exciting, cutting-edge course that is a mix of electronics, mechanics, and coding. The Arduino Uno processor is used to transfer coding instructions to various devices. Following instruction and practical experience in the basic understandings, participants in this course will be working to build a robotic car that they will program in a variety of ways. The final project allows students flexibility to use their new skills to devise a unique program to run their machines. A final showcase will allow students to share their learning.
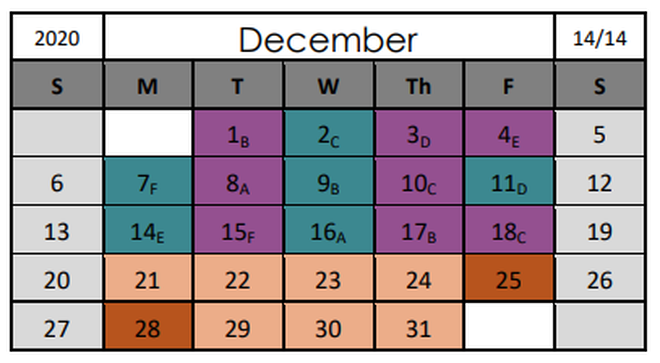
IMPORTANT NOTICE: Starting on Wednesday, November 18, 2020, students will be attending in-class instruction according to the schedule* below. Parents received an email informing them to which group they have been assigned. Note that Fridays are alternating. Students are to attend classes at school as follows:
Group A dates as shown
Group B dates as shown
*It is important to note that these are temporary measures and these dates/plans may change as new mandates are adopted.
Class ends on Tuesday, Dec 8. Q3 starts on Wednesday, Dec. 9, 2020.
Group A dates as shown
Group B dates as shown
*It is important to note that these are temporary measures and these dates/plans may change as new mandates are adopted.
Class ends on Tuesday, Dec 8. Q3 starts on Wednesday, Dec. 9, 2020.
*Groups are subject to change.
* Note: This calendar is subject to change according to decisions made by the Chief Health Officer and the School Division.
Assignments to do at Home**
- Module 4 - Careers and Training - read expectations carefully - post the finished assignment to Google Drive and put it in Module 4 in Google Classroom. Research well. This project is now overdue. See Mrs. Bitner with a plan if you still intend to complete it prior to Friday, November 27. After that, a permanent zero will be assigned.
- Module 8 - Final Project - read over the assignment to be sure you understand expectations. Prepare questions you have for your instructor. You will take measurements on the first day of small classes: 1. the long bridge; 2. the corner bridge; 3. the hall width. These measurements are done by tile length (30 cm, 12 inches).
- Module 8 - Final Project - Scale Drawing - you have been provided with graph paper to do three scale drawings. See the instructions in the module. Bring your scale drawings with you to class. (Remember that you may not do a triangle, square, oval, or wheelies)
- Module 8 - Final Project - Writing Code - Once you have your scale drawing done, you will need to write the code to make the robot car move through the course. You can download Arduino for free at home so that you can build code. If you do not remember how to write certain parts of code, do not hesitate to look it up online. You must type your code into the sketch and verify it from home. Email the code to yourself at school so that you can test it out on your car. Code does not always transfer well through One Drive.
| ||||
Module 01: SafetyCurriculum Outcome: ROBA1 General Safety (Core)
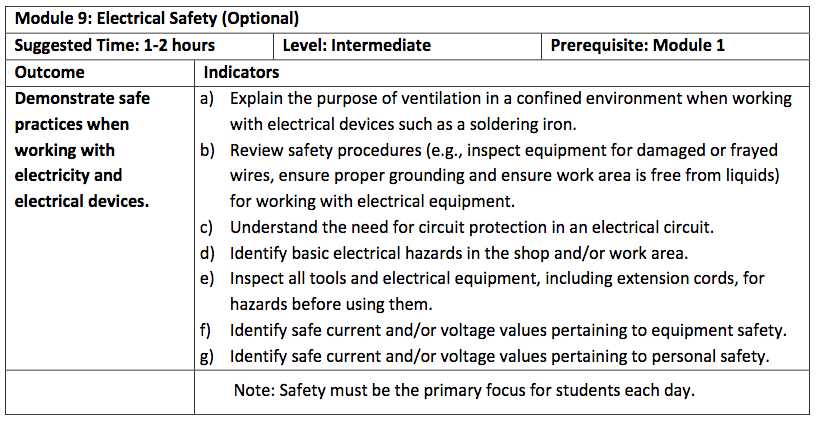
Apply principles and techniques for injury prevention to ensure safe work area. ROBA9 Electrical Safety (Optional) Demonstrate safe practices when working with electricity and electrical devices. 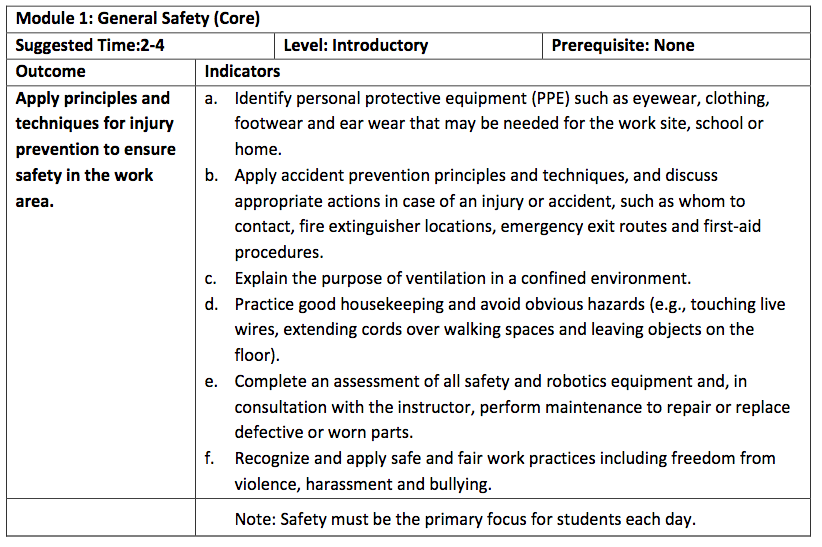
Assignment: Create a Safety Newsletter
Using Word, create a newsletter to inform others and remind yourself about the lab safety rules we have discussed. Your instructor has a sample. Exemplar: Below you will find the exemplar (unfinished) I prepared for you to see how the project is done properly. You many not copy what I have written, but you can use the points for inspiration. Your document needs to be in your own words, please. I have included a sample from a student as well.
Due Date: Friday, October 30, 2020
The history of robotics is explored in Robotics 10 through an instructor prepared slideshow, and then students worked to discover the types of robotics exist. The slide show is available here if students wish to review the material.
History of Robotics Review: explore the links (various formats) below for the history review we did in Grade 10. As you recall, robotics had its start more than a century ago. Watch it if you like.
Module 02: Electronics BasicsCurriculum Outcomes: ROBA12B Basic Electricity B (Optional)
Analyze the differences between parallel and series circuits. ROBA14B Electronic Components B (Optional) Explore the use of component parts in basic electronic circuits. 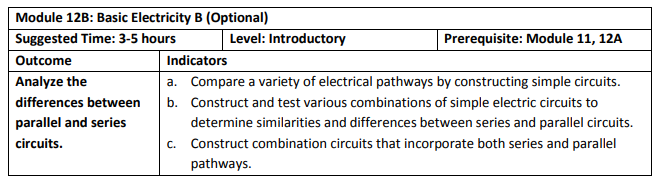
Simple Circuits - Series and Parallel Circuits
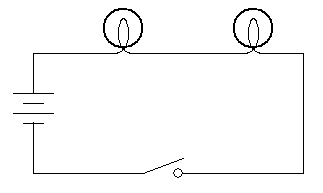
Series Circuits In a series circuit, devices are strung together one after another so that whatever current flows through one must flow through the each of the others. In this circuit, the current that comes out of the battery passes through both lights. Neither light gets the full voltage of the battery. The amount of current that comes out of the battery is determined by the total resistance of the circuit. Resistances in series add together. Mathematically, it looks like this: Rtotal = R1 + R2 + R3... 
If a switch is added to a series circuit, then it controls (turns ON and OFF) everything in that circuit. Adding a switch to the above circuit gives us the diagram below. If the switch is open, no current will flow at all and the circuit is incomplete. The switch could be placed anywhere in the circuit and it would have the same effect.
Parallel Circuits
In a parallel combination there is a junction, a "three point connection". In the example circuit below, the current entering the junction is split so that it goes in two directions. Only part of the current flows through each device. In this case, each device gets the full voltage of the battery. 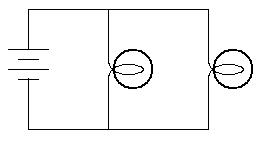
If resistors are combined in parallel, the total resistance becomes less, because the current has alternate paths. The mathematical rule is that the inverse of the resistances add together.
1/Rtotal = 1/R1 + 1/R2 + 1/R3... If we want to control these lamps with switches, we have options. One way is to add a switch like this... 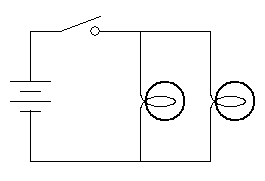
In the above circuit, the switch controls all the current flowing out of the battery and into the junction. If open, both lights will be OFF. When closed, it allows the current to flow and both lamps will glow. On the other hand, if you want to control the lights individually, then you need two switches, hooked up like this...
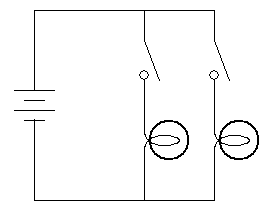
Each switch in this circuit controls one, and only one, of the lamps.
Assignment: Check out the online interactive circuit maker link shown below. Make 5 different working circuits. Go from simple to more complex. Take a photo of each circuit, put all on a Word document, and send it to me in Google Classroom.
Learning Help site (good for those learning about circuits for the first time). Be sure to choose "Electricity and Circuits" (Learning Circuits) activity, but try out the others for fun. AND Simple Learning of Circuits (good for visual and schematics learning) Use the username and password below to access the site (free during Covid-19 social distancing time):
AND More Complex interactive (If you already have a good understanding of circuits) The items that Robotics 20 students are expected to be able to use are as follows:
Due Date: Friday, October 30, 2020
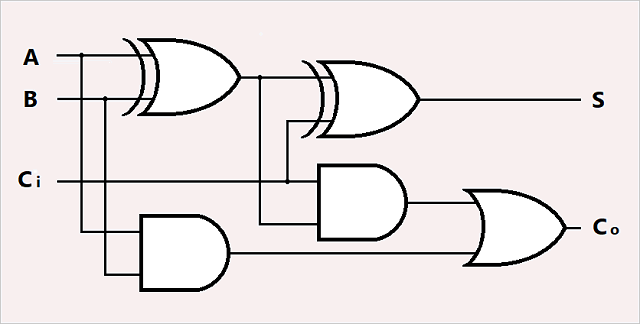
Coding and the Binary System
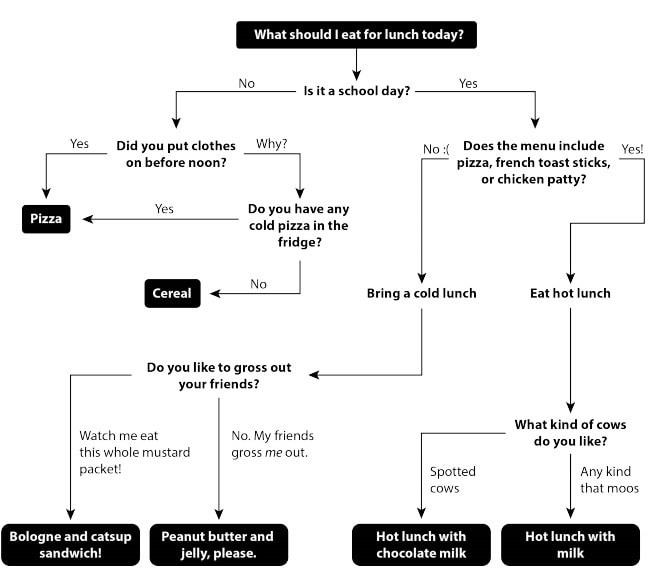
We will be using a game called Turing Tumble to help us understand how computers work using the binary system. Turing Tumble is a game where players build mechanical computers powered by marbles to solve logic puzzles. While they play, they learn key computer science concepts and build skills essential to coding. They also learn how computers work at a basic level: how simple switches, are connected together in clever ways to do intelligent things.
The concepts taught include the following: Logic gates, truth tables, conditionals, binary, binary operations, and digital circuit design. The game also builds skill in computational thinking, logic, algorithm design, critical thinking, debugging/troubleshooting, fine motor, spatial reasoning, and persistence. Working from home? You can use one of the online simulators below to experiment with the game. You do not have the game manual, but you can least experiment with the parts to determine the effect they have on the outcome.
External Resources:
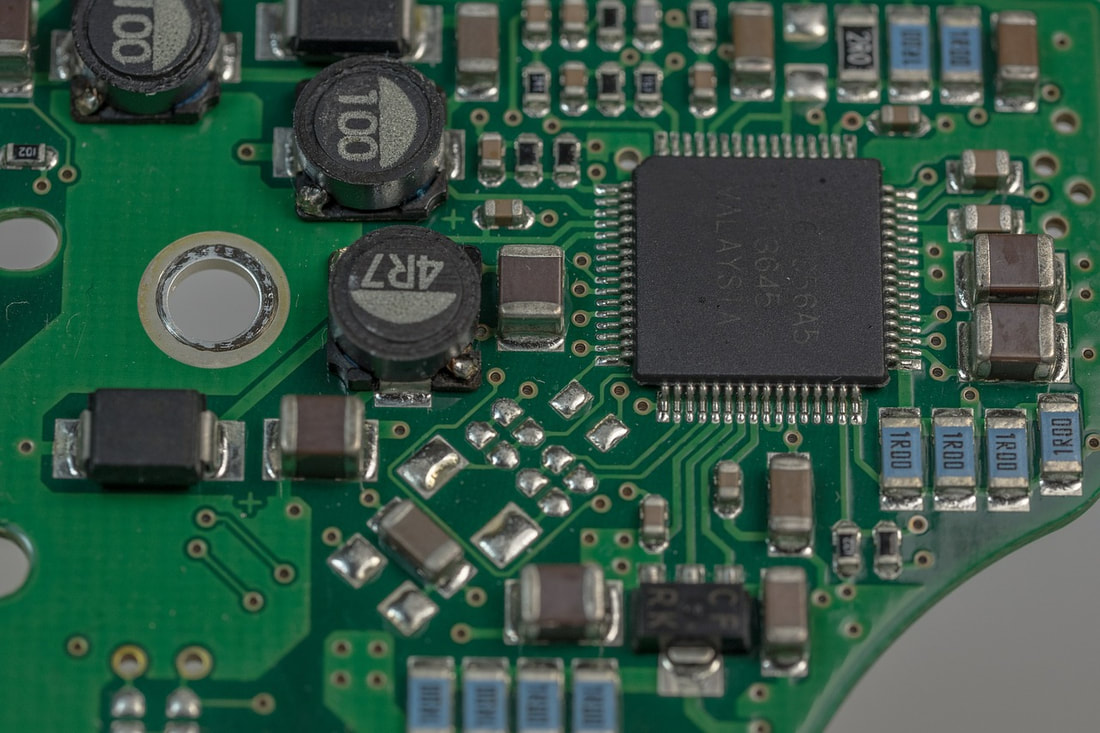
Lesson 1 - The Central Processing Unit (CPU)
Use the Turing Tumble Educator Guide in the External Resources above to help you understand how the game is like a computer. The central processor unit (CPU) is where everything happens. The CPU runs programs and does computations. The guide shows the structure o a CPU. On the bottom of the CPU thousands of little pins act as inputs and outputs for information entering and exiting the computer. Inside the CPU there are billions of switches. They are so small that you cannot even see them with your eye. These switches are actually called transistors and they are connected with tiny copper wires. Watch the Zoom into a Microchip video below to understand how very tiny these parts are. Nanotechnology is an exciting field to study, and new advances are making discoveries possible that make computers smaller and smaller.
Unlike light switches, transistors are are flipped by electrical energy and also control electrical energy. A switch needs mechanical energy (like a hand flipping a light switch.
Some switches are flipped by mechanical energy, and they also control mechanical energy. In the game, we call these blue and purple parts bits and gear bits. They are flipped by a ball rolling over them, and they control whether a ball rolls off their left or right side.
There are many other logic gates to explore. Here are a few:
NOT, NAND, and XOR gates. You will have an opportunity to do puzzles with these as well. Lesson 8 - Truth Tables
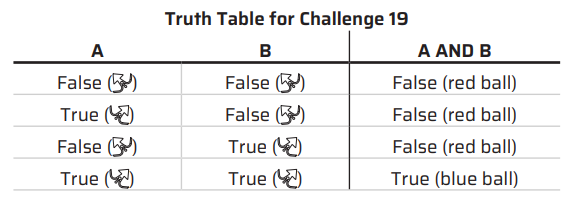
As you know, the starting setup in Turing Tumble affects the output. The starting positions of the bits are the input (on the left side of the '=>' symbol), and the colour of the ball that falls in to the interceptor is the output (on the right side of the '=>' symbol).
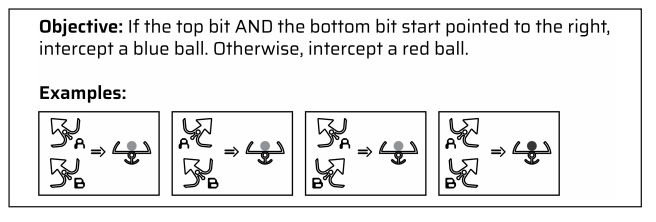
So in the truth table above, only the last setup will result in a blue ball as the output.
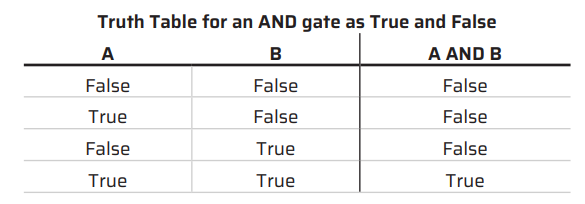
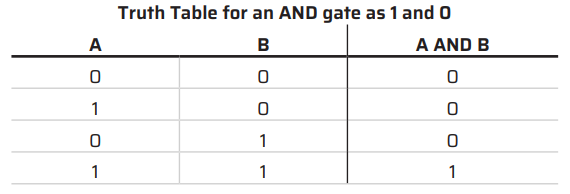
Truth Tables are a convenient and clear way to show the way a logic circuit behaves. Input combinations are on the left, and outputs are on the right. The inputs and outputs can also be written as "true' or 'false" or "1's" and "0's".
Take a look at Challenge 19 in Turing Tumble. Here is how the truth table would look:
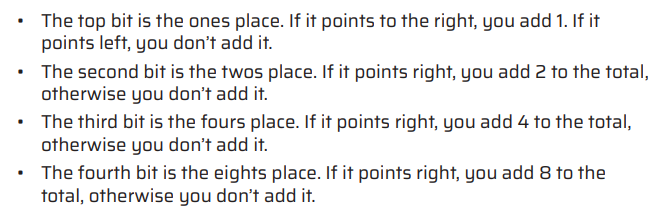
When you added, what number did you get?
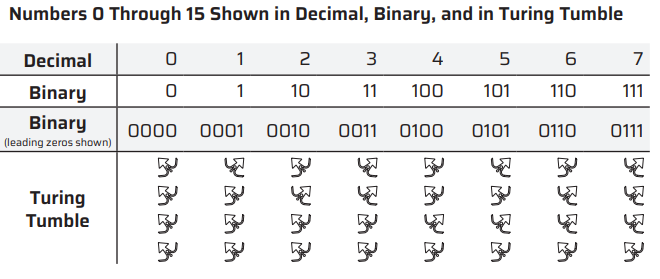
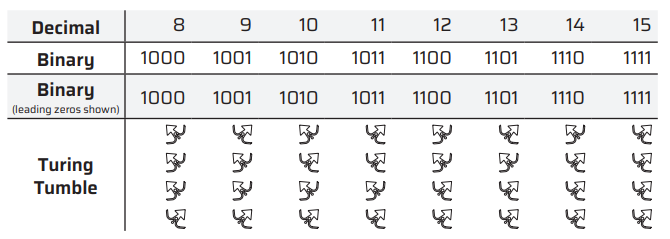
Study this chart so that you know how to figure out numbers for the quiz.
Quiz Date: Tuesday, November 17, 2020
Here is the quiz. Do not start it until you are given the go-ahead. Remember that you can use any materials provided through this study to help you. You only get one attempt, so do not start and stop partway through. You must do the whole quiz in one sitting and you only get one opportunity to complete it. There will be no rewrites.
Wait for the signal and . . . Start the Quiz 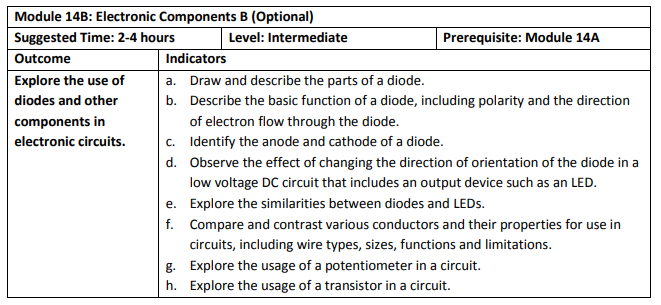
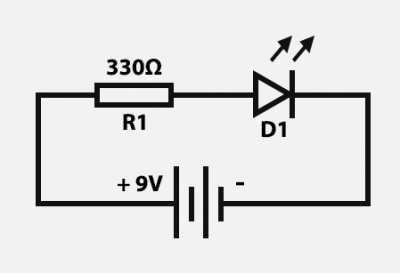
Diodes
What is a diode? The main function of a diode is to control the direction of flow in a current. When a current passes through a diode, it can go only one way (called forward) because the reverse direction is blocked. It is like a one-way street or a valve in the heart. There are two terminals on a diode (one at each end). The terminals are polarized. The positive end of the diode is called the anode, and the negative side is called the cathode. It is only possible way for the current to flow is from the anode (positive) to the cathode (negative). 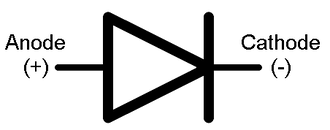
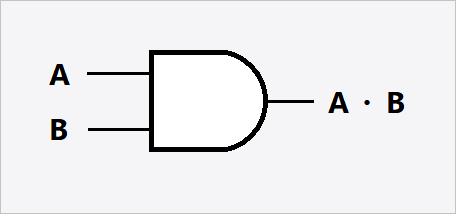
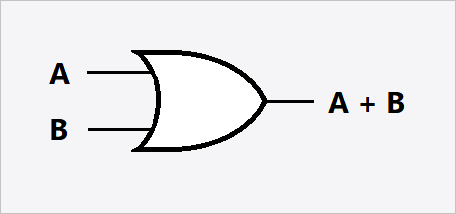
Transistors
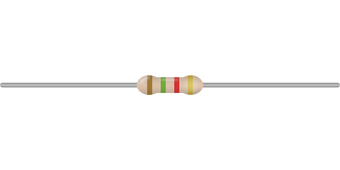
Resistors
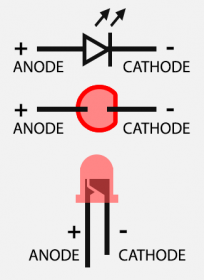
Resistors: The job of a resistor is to restrict the flow of electrons in a circuit, thereby reducing the current or voltage by converting electrical energy to heat. They come in a variety of sizes and shapes depending on the amount of current that can pass through them. You can see samples of different kinds of resistors below. It is important to understand and be able to use Ohm's Law to calculate the amount of resistance that must be applied to maintain the integrity of a circuit (so things don't blow up). Our equipment budget is limited, so preservation (and of course, safety) is vital.
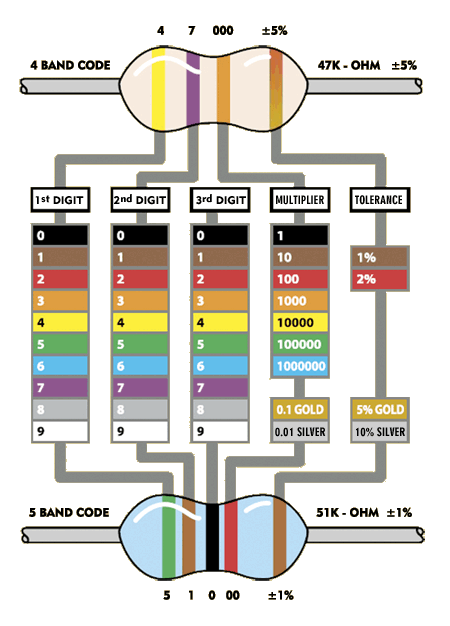
Retrieved from http://www.flradiodoc.com/images/resistor-color-coding.png www.flradiodoc.com/radio-resources/fl-radio-doc-resources.html
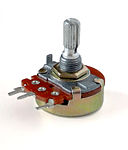
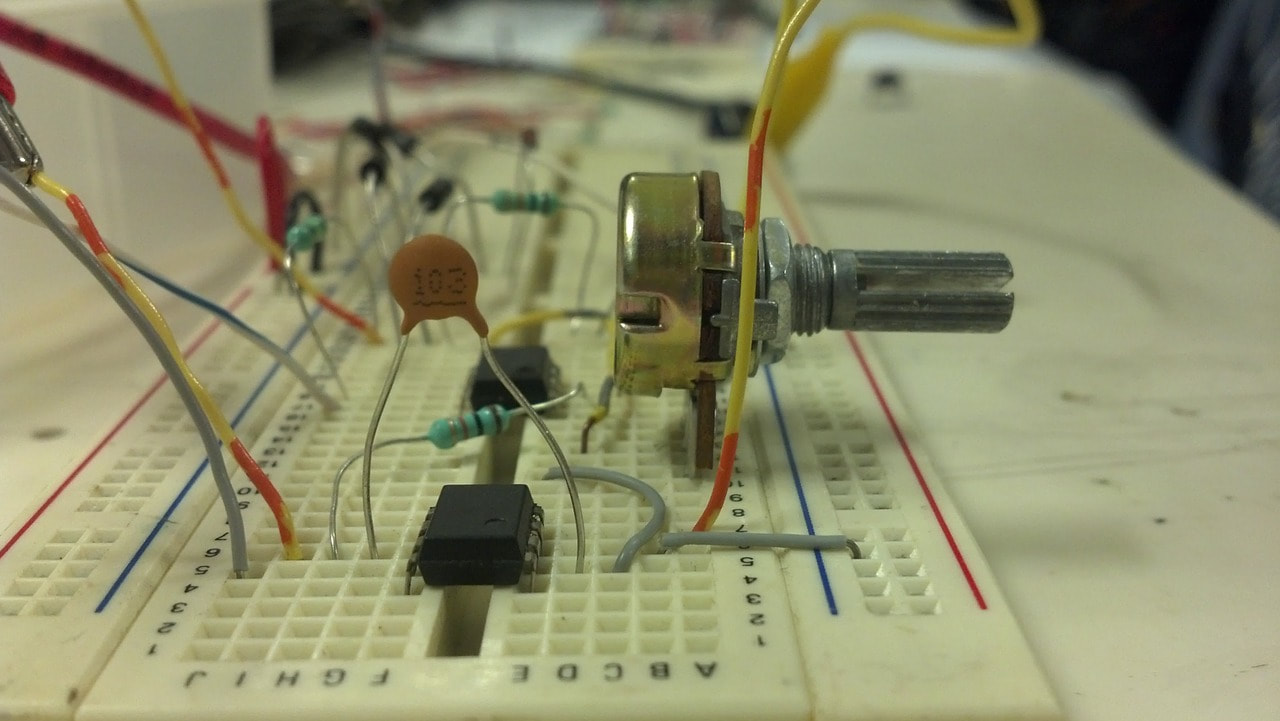
Potentiometers
Variable resistors (also known as potentiometers) are controlled with a dial so that the amount of resistance can be changed when the dial is turned. You have a potentiometer on the radio volume dial in your car.
Attribution: Potentiometer.jpg By Iainf (Self-photographed) [GFDL (http://www.gnu.org/copyleft/fdl.html), CC-BY-SA-3.0 (http://creativecommons.org/licenses/by-sa/3.0/) or CC BY 2.5 (http://creativecommons.org/licenses/by/2.5)], via Wikimedia Commons
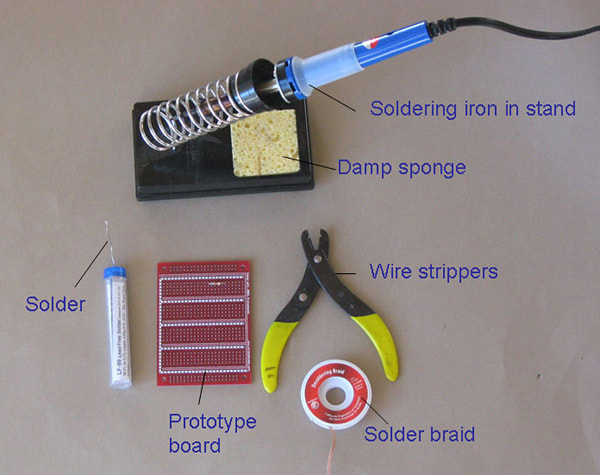
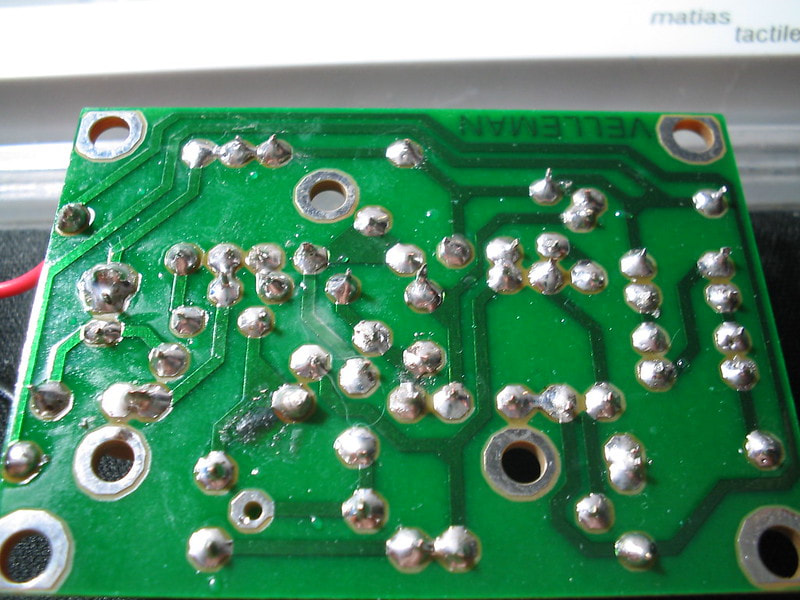
Soldering PCBIn Robotics 20, we have the opportunity to practice soldering with PCB board. You will have an opportunity to practice with resistors before you have your test for marks. Review these images and watch the videos to understand how to solder properly with PCB.
Assignment: The instructor will provide you with a piece of PCB onto which you will solder three resistors as per instructions given in practice.
Assessment: The instructor will mark your soldering on the following:
Due Date: Wednesday, November 18, 2020 Module 03: Ethics/File ManagementCurriculum Outcome: ROBA3 Ethics and Law (Core)
Explore ethical, moral and legal issues relevant to robotics and autonomous devices. 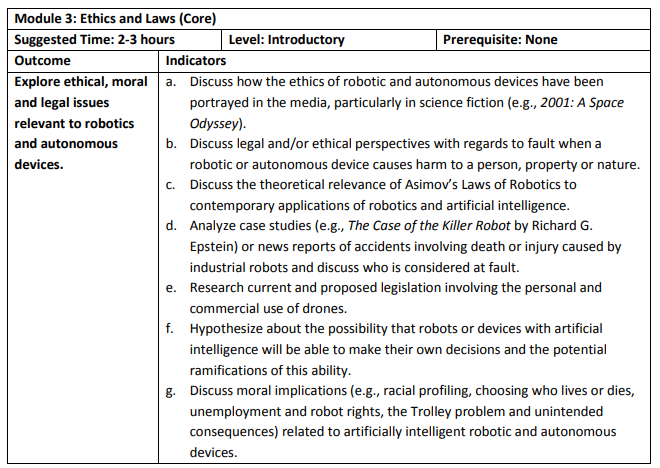
PART 1
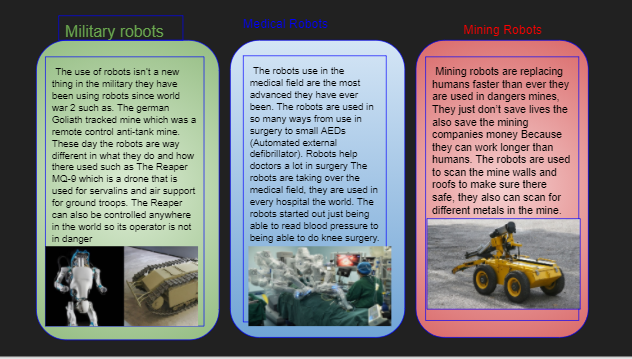
Many movies featuring robots and artificial intelligence have been made. Look at the External Resources section below for a listing of many of them. The movies are available for viewing on Netflix, Disney, Prime, or in pieces on YouTube. You may even own a few DVD's of some of the titles.
Assignment 1: Research one (1) movie that involves robots or artificial intelligence. Choose a movie in which robots or AI feature prominently (be sure it is appropriate to present at school). Each person in the class must choose a different movie, so make your choice and let your instructor know which movie you are choosing as soon as possible.
Make a Google Slides presentation about the way robots/AI are portrayed in the movie. Your slideshow must include all items on the following chart: 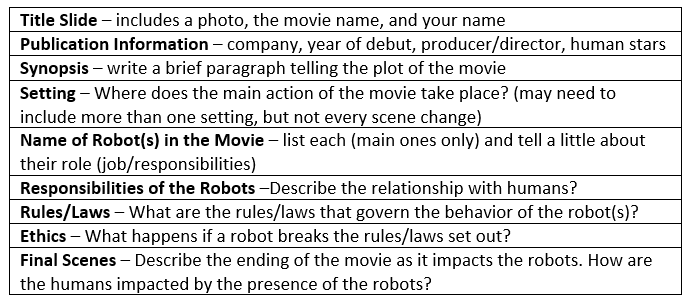
You do not have to watch the entire movie, unless time allows and you wish to do so. Otherwise, you may just skim (fast-forward) through it to learn what you need to know to complete the assignment. All writing must be in your own words. Copy/paste is not acceptable. Be sure to include movie photos to enhance your presentation when available.
Submit your assignment to Google Classroom, Module 1, Movie Robots. External Resources:
Due Date: Friday, November 6, 2020
PART 2
Asimov's Laws
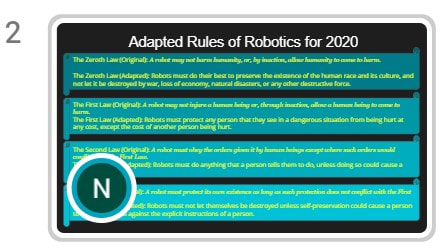
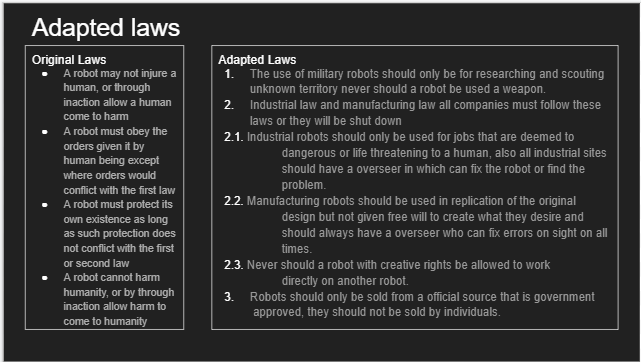
First Law: A robot may not injure a human being or, through inaction, allow a human being to come to harm. Second Law: A robot must obey the orders given it by human beings except where such orders would conflict with the First Law. Third Law: A robot must protect its own existence as long as such protection does not conflict with the First or Second Law. Over time, Asimov added another law. Zeroth Law: A robot may not harm humanity, or, by inaction, allow humanity to come to harm. Assignment 2: Consider Asimov's laws as they might apply to what is happening in the world of robotics today.
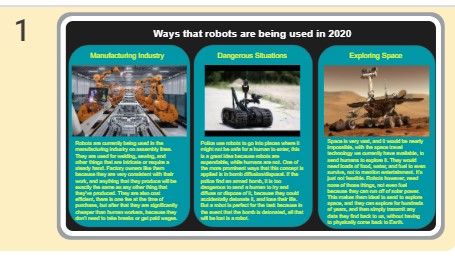
Exemplar provided by Nicolaas. Thanks Nick.
More exemplars from Andre, Matthew, and Davin. Thank you.
Due Date: Friday, November 6, 2020
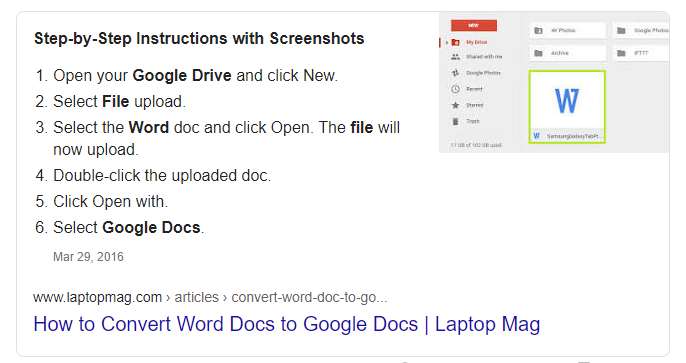
File Management
Please put all of your assignments within your Robotics 20 file created in the first week. You will need to put each of these assignments into your Google Drive account and then load them into the correct spot for each assignment in Google Classroom.
Module 04: Careers & TrainingCurriculum Outcome: 68B: Careers in Robotics/Automation B (Core)
Examine the skills necessary to pursue robotics and/or automation related career paths. 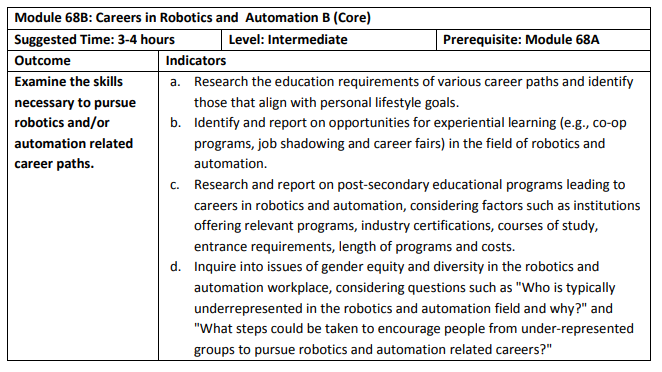
Assignment: Choose one of the following projects and prepare a Google Slides presentation to teach your peers about opportunities in robotics:
Here are some exemplars from students who completed the assignment early.
2. Explore the concept of gender equity and diversity in robotics and the automation workplace. Find charts/graphs/pictograms etc. to show how women/men/LBGQT are represented in these jobs. Write, in your own words, about what needs to be changed to make the robotics and automation industry more inclusive (see d. above). A four page Google Slides presentation is the required minimum.
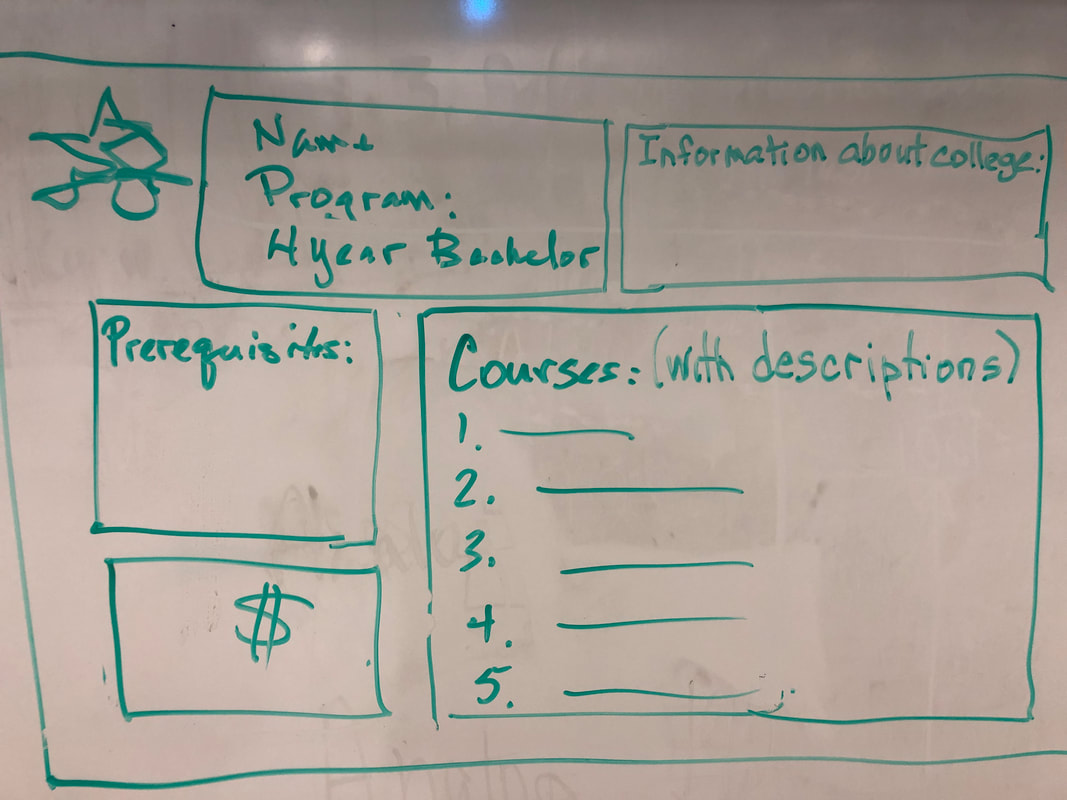
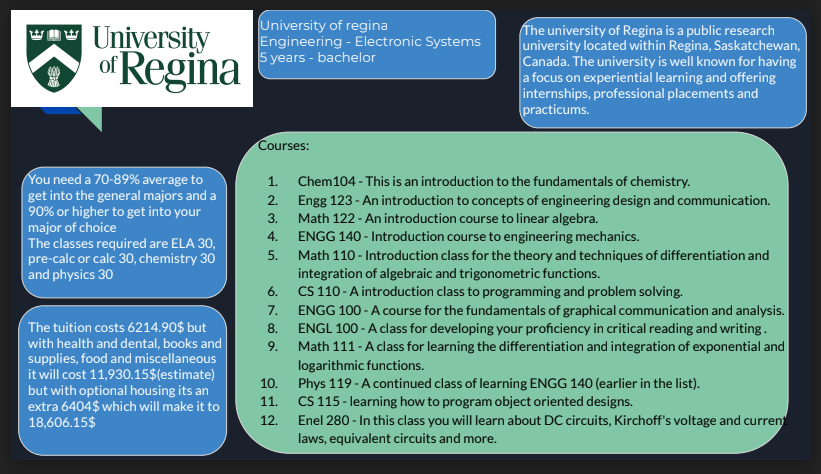
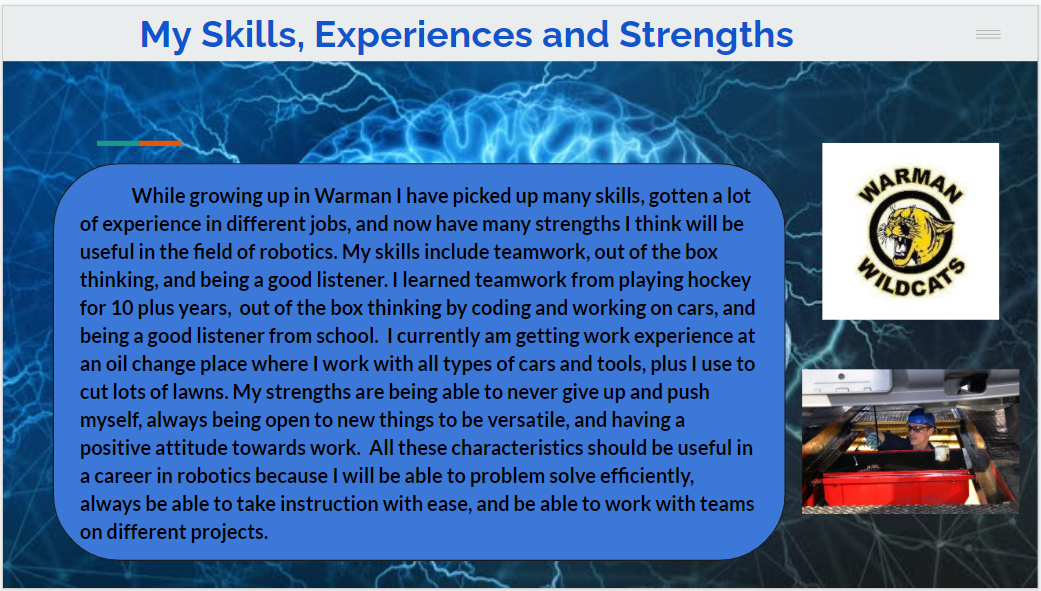
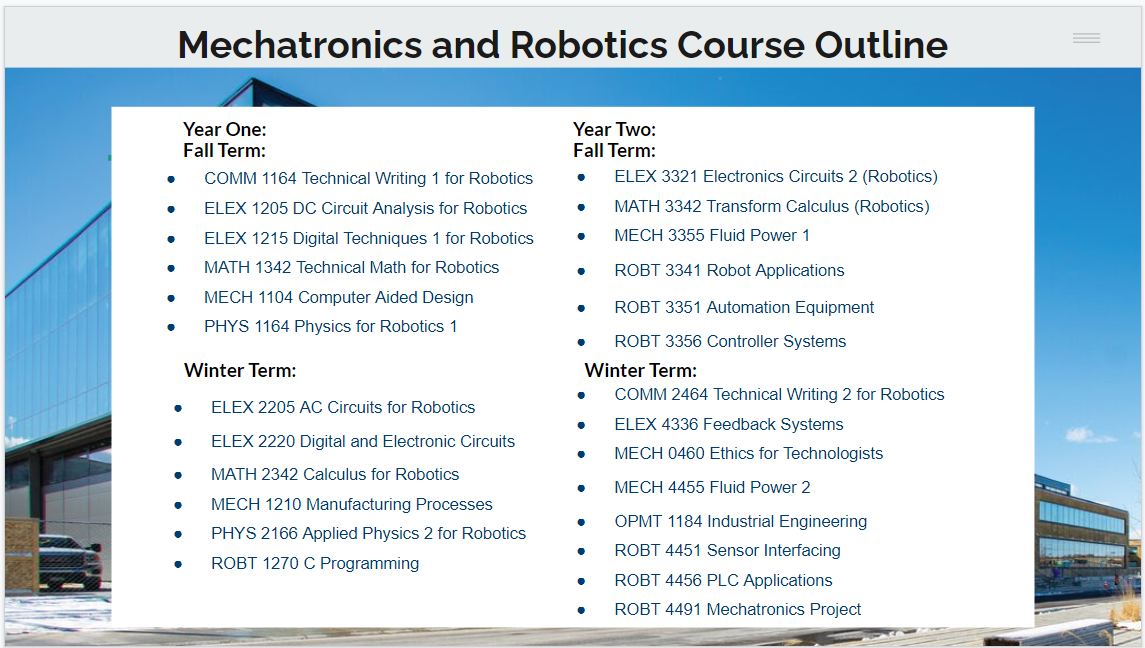
3. Explore learning opportunities/ work experience opportunities /on-the-job training opportunities available for people who are unable to attend training at institutions. Make a four page Google Slides presentation to present these options. A significant amount of research is expected and all writing must be in your own words (see b. above). 4. If you are considering a career in robotics, make a Google Slide presentation that includes the following (see a. above): a Title Slide, a page about yourself and the aptitude you possess (skills, attitudes, strengths, experiences), and two slides that each describe a different educational institution you would like to attend to get more training (with descriptions/illustrations) about what is offered). All writing must be in your own words. Here is an exemplar for #4 from a student who finished early.
Due Date: Tuesday, November 24, 2020 @9:00 a.m.
Module 05: Car Construction /Mechanical Devices
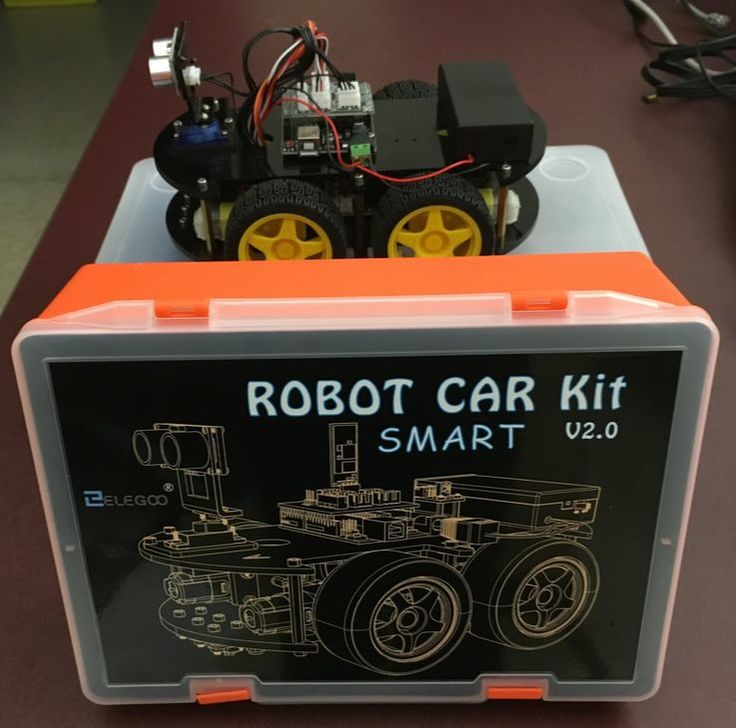
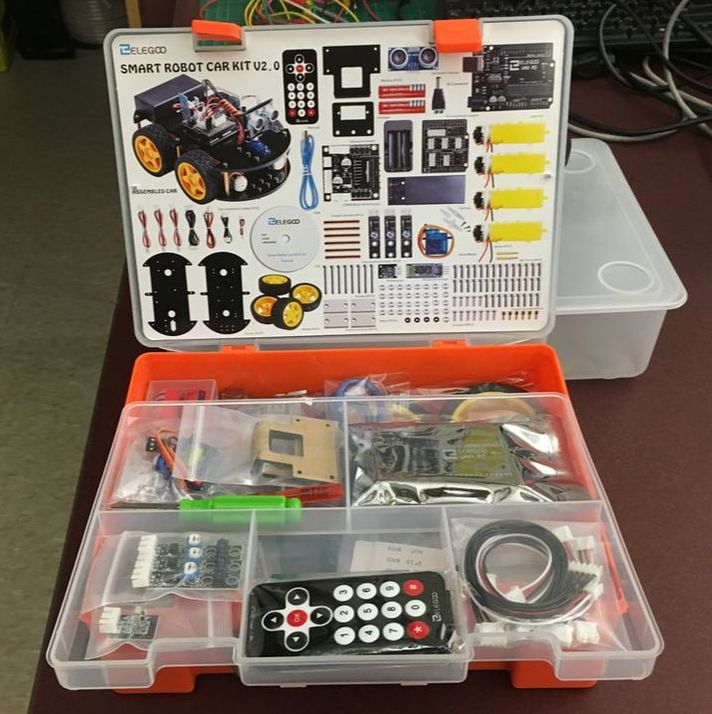
See the Elegoo Upgraded Arduino Uno Smart Car you will be building in action.
Part 1 - Research Mechanical Parts
The instructor will provide you with a Robot Car provided for use in this course. The first thing you will do is examine the contents of the box. Assignment: Research each of the mechanical components found in the kit (do not include screws or wheels in your research). Use the resources found in Multimedia/Class Assignments/Robotics/Elegoo Instructions for v.3
to locate photos of all the mechanical parts. Take a snippet of each part and put it in Word or Google Doc. Then research each part to know what it is called, what it does in the robot car, and how it works. Be thorough. Be sure you understand what you wrote. Submit the assignment in Google Classroom in Module 5. Title the document, "Parts of an Elegoo Upgraded Smart Car Robot Kit".
Due Date: Friday, November 6, 2020
Part 2 - Assemble Your Car
Use the assembly instructions found in the same Elegoo instructions for v.3 location that you used for the assignment above. When you have carefully assembled the car, continue with the "How to make your car move" pdf and learn about the functioning of ENA and ENB, and examine how the tire motors are attached to IN1, IN2, IN3, and IN4. Figure out which tire is which so you know how to code it. The instruction package provides you with activities to test your car. It also gives you sketches to try it out with Arduino code. Test all these codes on your car. Part 3 - Make Your Car Move by Creating Code
Coding:
Here are some functions and basic codes for your use with the cars we have purchased.
Now that you have an idea how to make your car move, type code (feel free to refer to other code) to do two assignments.
Assignment 1: Make your car move in a rectangle that is approximately four floor tiles long and two or three wide. The car must end up back on the same tile to repeat the rectangle. Carefully adjust your code so that the car makes tight turns, not curved ones. Assignment 2: Make your car move in an oval that approximately moves around the outside of eight floor tiles (8 sq meters). The car must end up back on the same tile to repeat the oval. Carefully adjust your code so that the car makes curved turns, not square ones. Note: Be sure to save the code and title it using proper format: /* Title of Project Your full name Date */ Due Date: Monday, November 16, 2020 External Resources
Demo of Robot Smart Car for Arduino Uno Car Kit Construction with Advice Pull Apart Video of Construction Construction with Greg Griffes Module 06: Review
| |||||||||||||||||||||||||||||||||||||||||||||||||||||||||||||||||||||||||||||||||||||||||||||||||||||||||||||||||||||||


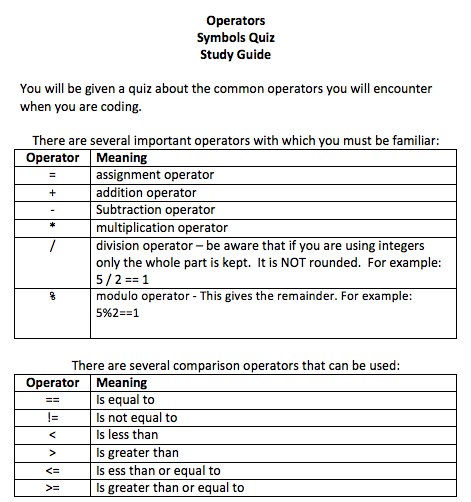
| printable_operators_study_guide.docx |
If Statements
Refer to the external resource below, p. 17, to learn about If Statements. Your teacher will work through this section with you to make sure you understand how these would work in Arduino code.
Refer to the external resource below, p. 17, to learn about If Statements. Your teacher will work through this section with you to make sure you understand how these would work in Arduino code.
Assignment 1:
Work together with a partner to create code to turn on an LED with a decreasing delay. Refer to the "Piece of Cake" manual (Paul Smith) for the code (p. 17-20).
For this assignment, you must provide your teacher with evidence of your learning:
Work together with a partner to create code to turn on an LED with a decreasing delay. Refer to the "Piece of Cake" manual (Paul Smith) for the code (p. 17-20).
For this assignment, you must provide your teacher with evidence of your learning:
- a flow chart
- the code with appropriate pseudo code (commentary)
- the working electronics
Else Statements
For this assignment, please refer to p. 20 of Introduction to Arduino: A Piece of Cake (from External Resources above or the binders in the lab), Lesson 2.3.
For this assignment, please refer to p. 20 of Introduction to Arduino: A Piece of Cake (from External Resources above or the binders in the lab), Lesson 2.3.
Assignment 2:
Work together with a partner to create code to turn on an LED with a decreasing delay and an else statement. Refer to the "Piece of Cake" manual (Paul Smith) for the code (p. 20-21).
Work together with a partner to create code to turn on an LED with a decreasing delay and an else statement. Refer to the "Piece of Cake" manual (Paul Smith) for the code (p. 20-21).
- a flow chart
- the code with appropriate pseudo code (commentary)
- the working electronics
Assignment 3:
3. Write your own code and comments to make this program. Be sure that you have properly saved and described it with comments.
4. Show your instructor your working electronics and Arduino uno program.
External Resources:
If/Else Statements
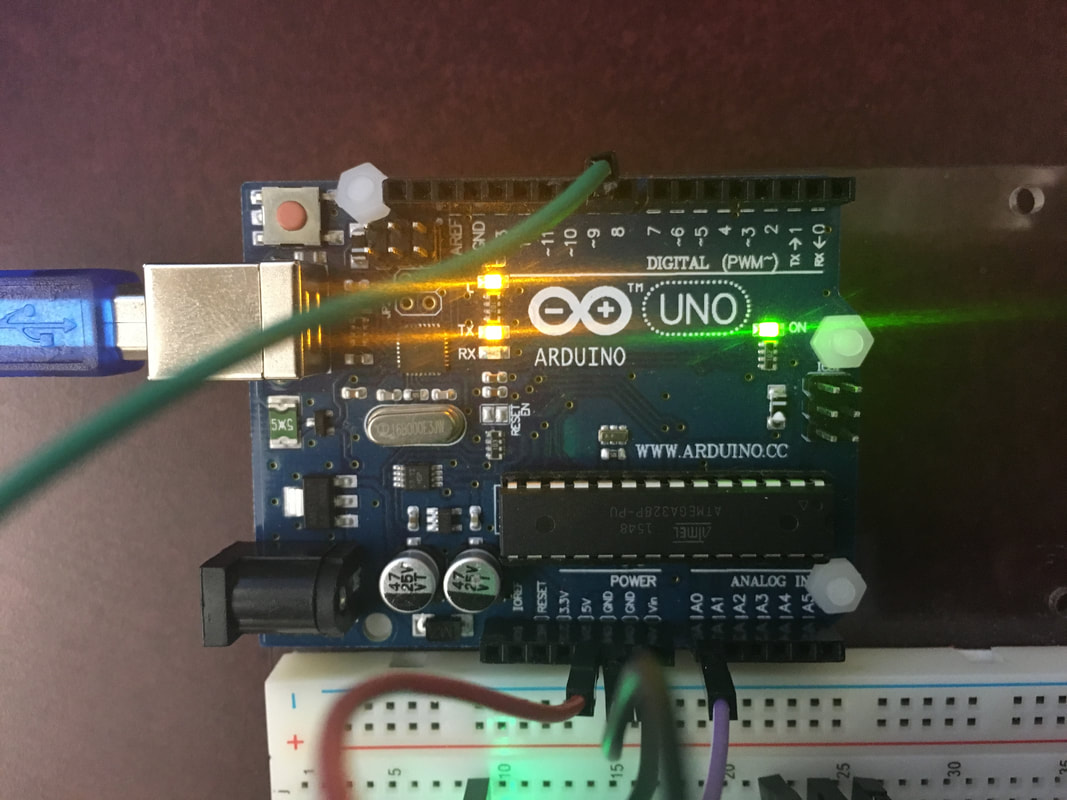
- Work together with a partner to create code to turn on an LED with the push of a button switch. Refer to the "Piece of Cake" manual (Paul Smith) regarding if and else statements. You must do #2 before you build the electronics. You may only use the following items:
- 3 male to male jumper wires
- 1 LED placed in pin 13 (anode, long, positive) and GND (cathode, shorter, negative)
- a 1K resistor (1000 ohms)
- a button switch
- an Arduino uno with USB cable
- online Arduino sketch program
3. Write your own code and comments to make this program. Be sure that you have properly saved and described it with comments.
4. Show your instructor your working electronics and Arduino uno program.
External Resources:
If/Else Statements
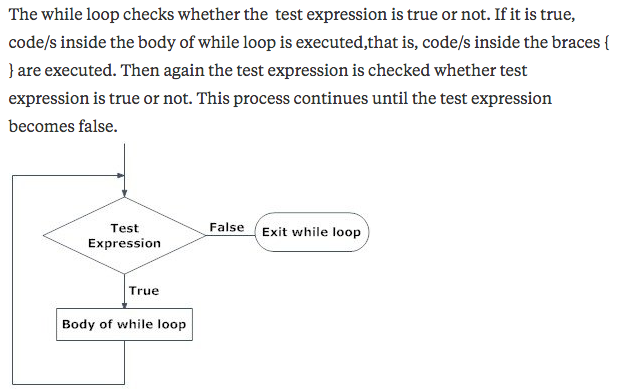
While Loops
While Loops will loop a code repeatedly until what is in parenthesis () becomes false. Usually, this means that there is data coming from a sensor (external source) or from an incremented or decremented variable (i.e. x++ or x--) within or code (internal source). See page 21& 22 (Lesson 2.4) in Introduction to Arduino: A Piece of Cake (external link above or binders in the lab).
Assignment 4: While Loops
Use the sample code and electronics (provided below) to set up and run the While Loop sketch. Surprise! You can copy/paste the code this time. Show your instructor when done.
External Resource:
Arduino While Loops
Arduino While Loop - Sample (this one gives you code to copy/paste - go ahead)
While Loops will loop a code repeatedly until what is in parenthesis () becomes false. Usually, this means that there is data coming from a sensor (external source) or from an incremented or decremented variable (i.e. x++ or x--) within or code (internal source). See page 21& 22 (Lesson 2.4) in Introduction to Arduino: A Piece of Cake (external link above or binders in the lab).
Assignment 4: While Loops
Use the sample code and electronics (provided below) to set up and run the While Loop sketch. Surprise! You can copy/paste the code this time. Show your instructor when done.
- a flow chart
- the code with appropriate pseudo code (commentary)
- the working electronics
External Resource:
Arduino While Loops
Arduino While Loop - Sample (this one gives you code to copy/paste - go ahead)
|
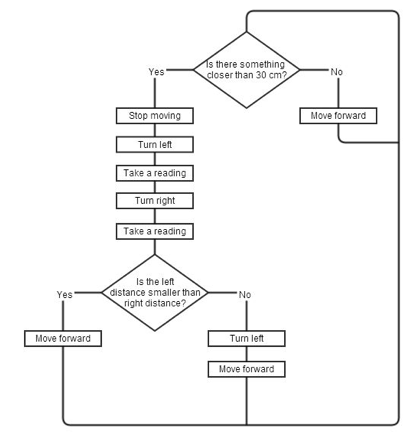
Here is a sample of a While Loop code that could be used to control a robot car. This is not the flow chart for the assignment above. Notice that while a certain condition exists, the loop continues. When the condition changes, so does the response.
|
Assignment 5:
Once your teacher has shown you how to use SerialPrint, add it to your Assignment 1 code and run your electronics again. Watch the code as it is executed by your program. In digital mode, you will see lots of 1s and 0s, but this will all change when we learn about Analog inputs and outputs.
Once your teacher has shown you how to use SerialPrint, add it to your Assignment 1 code and run your electronics again. Watch the code as it is executed by your program. In digital mode, you will see lots of 1s and 0s, but this will all change when we learn about Analog inputs and outputs.
Pulse Width Modulation - Lesson
We learn about Analog functions and Pulse Width Modulation (PWM). PWM allows for digital methods to be used to get analog results. In order to accomplish this, square waves are used. The signal is switched quickly between on and off creating these square wave. The amount of time that the pulse is on is called the Duty Cycle and creates the pulse width. The truth is that the circuit is still getting a full 5V or 0V, but it happens so quickly that the eye sees it as dimmer than full brightness. If you change that amount of pulse width, you can make the light seem brighter or dimmer.
Study the diagrams below:
For Loops
Assignment 7: For Loops
Read the article listed below in External Resources. In the lesson, you will learn more about the for loop. It is used for a repeated operation. Notice the three elements inside the brackets: initialization, condition, and increment. Read carefully for understanding. Set up a circuit and coding according to instructions in the external resource. Remember that the Pulse Wave Modulation maximum value is 255.
External Resources:
Arduino For Statements
Functions
By establishing functions as separate sections of code, the programmer can pull in the function with function name and does not have to write out all the code associated with that function.
For example, if the programmer wants a car to move forward, turn right, move forward, turn left, move forward . . . s/he does not want to type in all the code to move forward over and over again. She/he can write a void function () that moves the car forward and then just type
Assignment 7: Functions
- Read and discuss, with your partner, How to Write and Use Functions for Arduino.
- Take a look at the car_in_oval code written by Mrs. Bitner. Examine code to see the how a function is used.
- Together as a group, we will do some discussion about the sketch below. You do not have to make a circuit or write code for this assignment. You just need to be an enthusiastic participant to earn your mark for this assignment.
External Resources:
How to Write and Use Functions for Arduino | |||
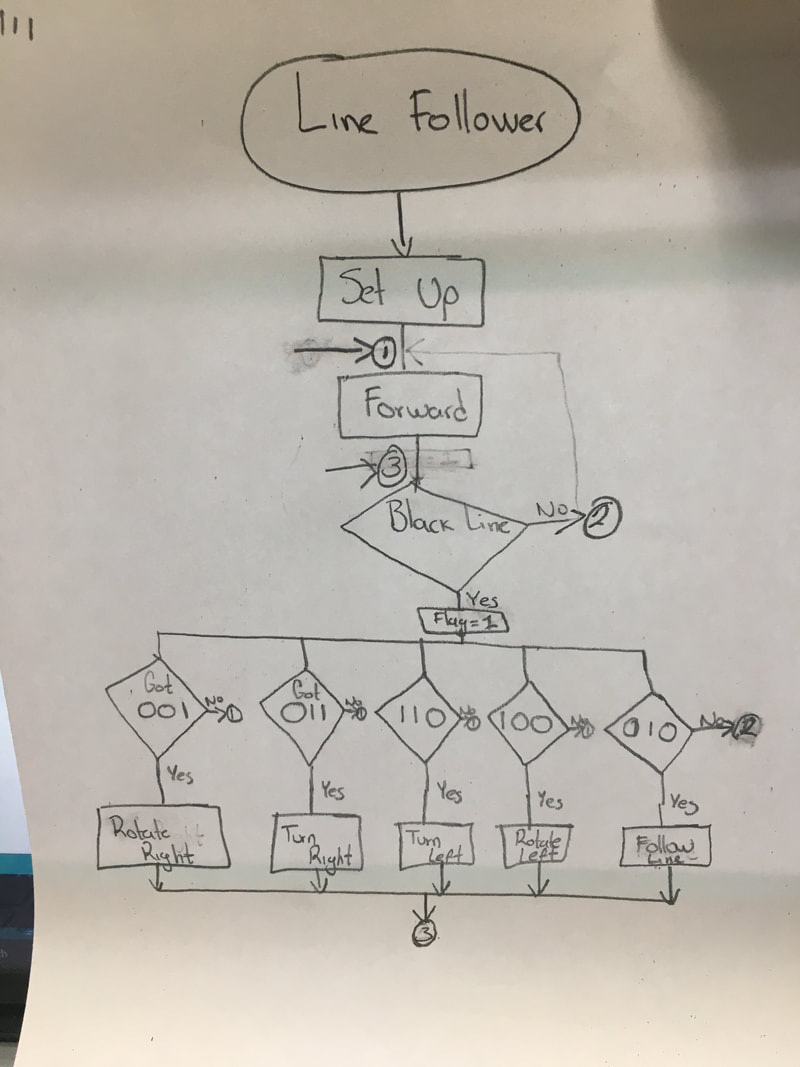
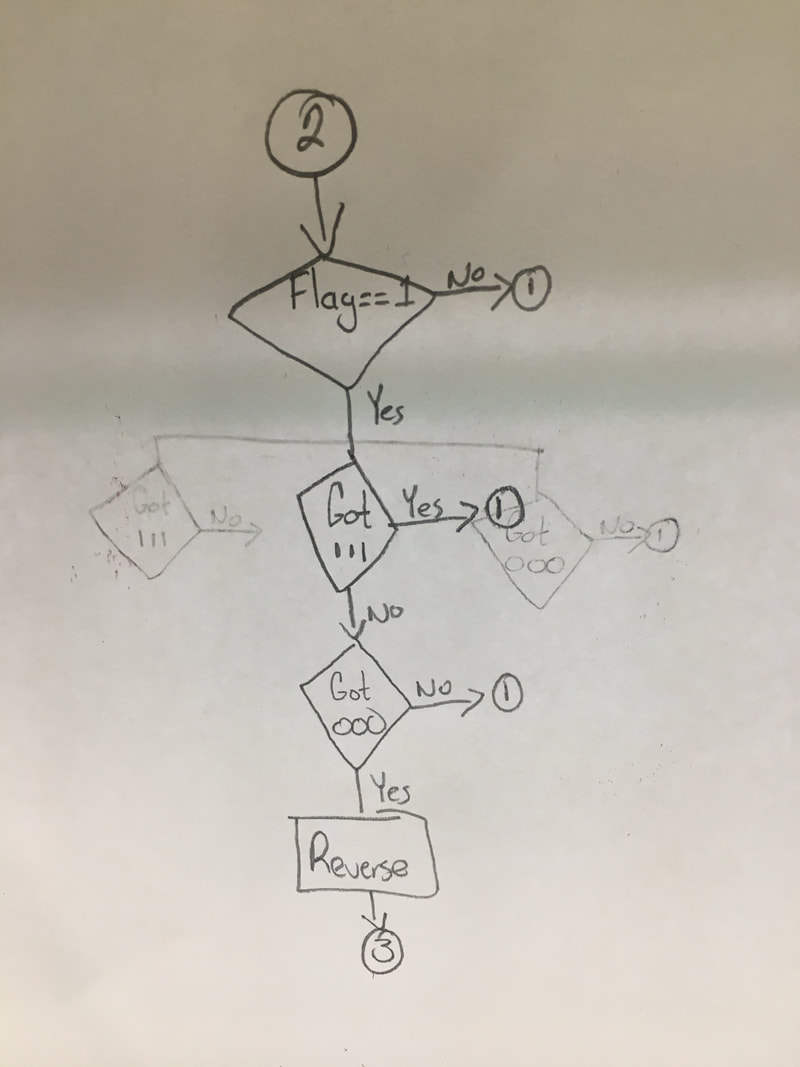
Module 7A: Line Follower Coding
Students will be making a black line track and programming their cars to follow the line. Students will be expected to show Mrs. Bitner the code with commentary and the car moving on the track.
| lesson_5_line_tracking_car.pdf |
| line_tracking_car.ino |
|
|
|
Students in Group A tested their Line Follower sensors and then designed their own course on November 18, 2020.
Group A displayed initiative in creating and extra large design to test in the hallway.
|
|
|
Group B utilized the design of Group A, added on another length, and added a tunnel and ramp (since we had these out for measuring).
Module 7B: Sonar Sensor/Infrared
Students will program the ultrasonic sensor to respond to the presence of obstacles and causing the car to turn towards the area that offers the longest path.
Students will watch and discuss the first video in class. The speaker discusses in simple terms how the ultrasonic sensor works. The second video is for those who are serious about studying what the sensor is capable of doing and how the calculations are done. It also includes explanations of how code is written to utilize the sensor.
Students will watch and discuss the first video in class. The speaker discusses in simple terms how the ultrasonic sensor works. The second video is for those who are serious about studying what the sensor is capable of doing and how the calculations are done. It also includes explanations of how code is written to utilize the sensor.
| lesson_4_obstacle_avoidance_car.pdf |
| obstacle_avoidance_car.ino |
Students will enable the infrared sensor and program their robot car to move in response to pre-written code.
| lesson_3_infrared_remote_control_car.pdf |
| infrared_remote_control_car.ino |
| ir_remote.pdf |
| faq_irremote.pdf |
If you have trouble, you can go onto the Media Drive/ALL Driver Codes and choose their specific car (v. 2.0 or 3.0).
Module 8: Final Project
The Final Project takes the place of a final exam. It must be completed in order for a pass to be given for the class.
Once all the other modules are marked, students will plan a programming project of their own for the Smart Robot Car.
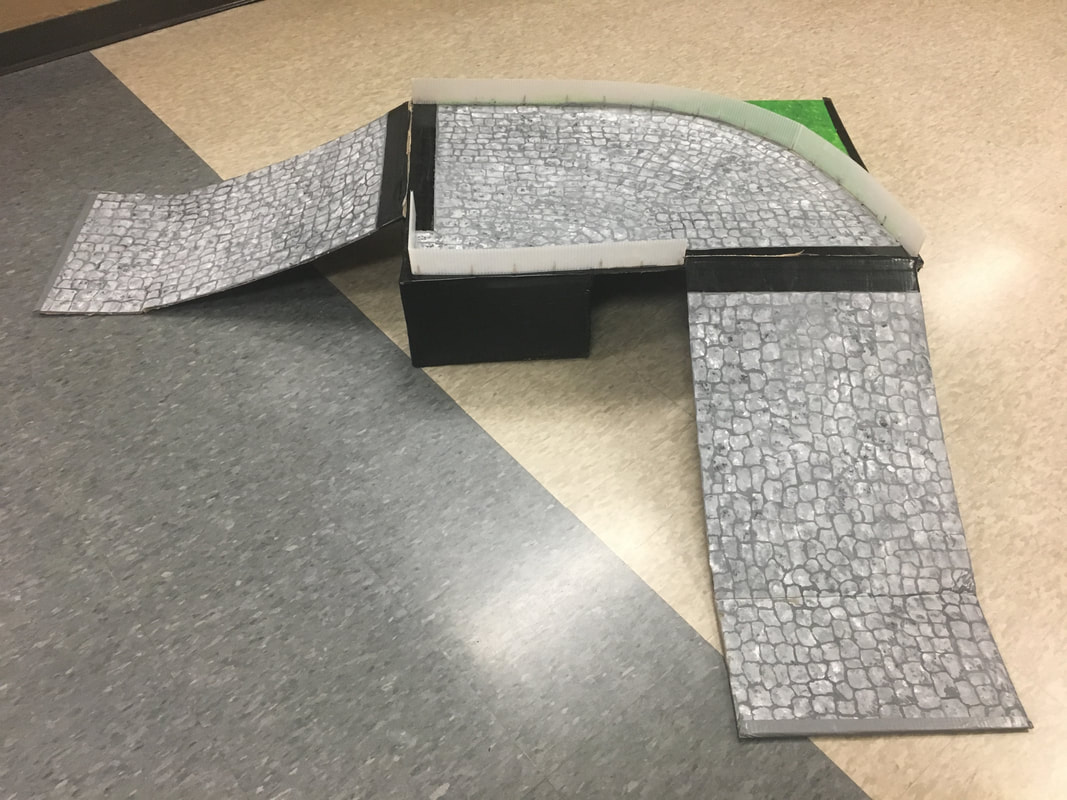
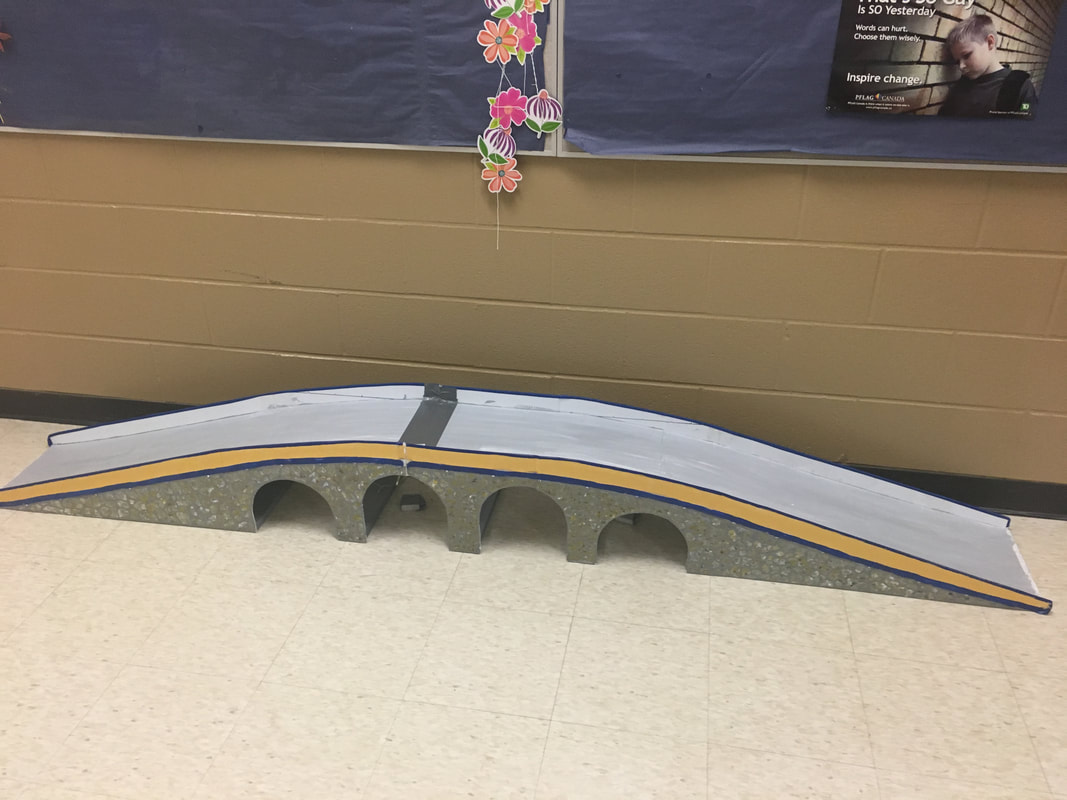
Students are responsible for individually developing a scale drawing and then writing code to cause their car to drive through the course they design. The course designed must include the bridge and offset corner turn course pieces seen in the pictures below. The course pieces are available in class so that students can measure distance and calculate movements. Three to five additional complex coding sequences are also required as part of the project. Students must get approval from the instructor for their preliminary proposal prior to beginning to code and test. Changes are allowed, but approval for each change must be obtained.
Organizational timeline:
- Make a preliminary scale drawing plan that includes sequences and distances between sequences.
- Get the instructor's initials on your preliminary plan to indicate you are ready to code and test. The same sequences will not be approved for partners or people working in close proximity. The same sequence will not be approved for more than two students in the class. Be creative in your planning and show your talent.
- Begin coding and testing your sequences. You may utilize previously written code to assist you in creating your own, but you may not copy and paste a sequence and call it your own.
- Make revisions to your scale drawing as needed (determined by your car's response to your programming). Be sure to get approval for your changes. No changes can be made after __________________
- Be prepared for presentations with your sequences loaded and a good copy of your scaled drawing stapled on top of all preliminary versions.
|
|
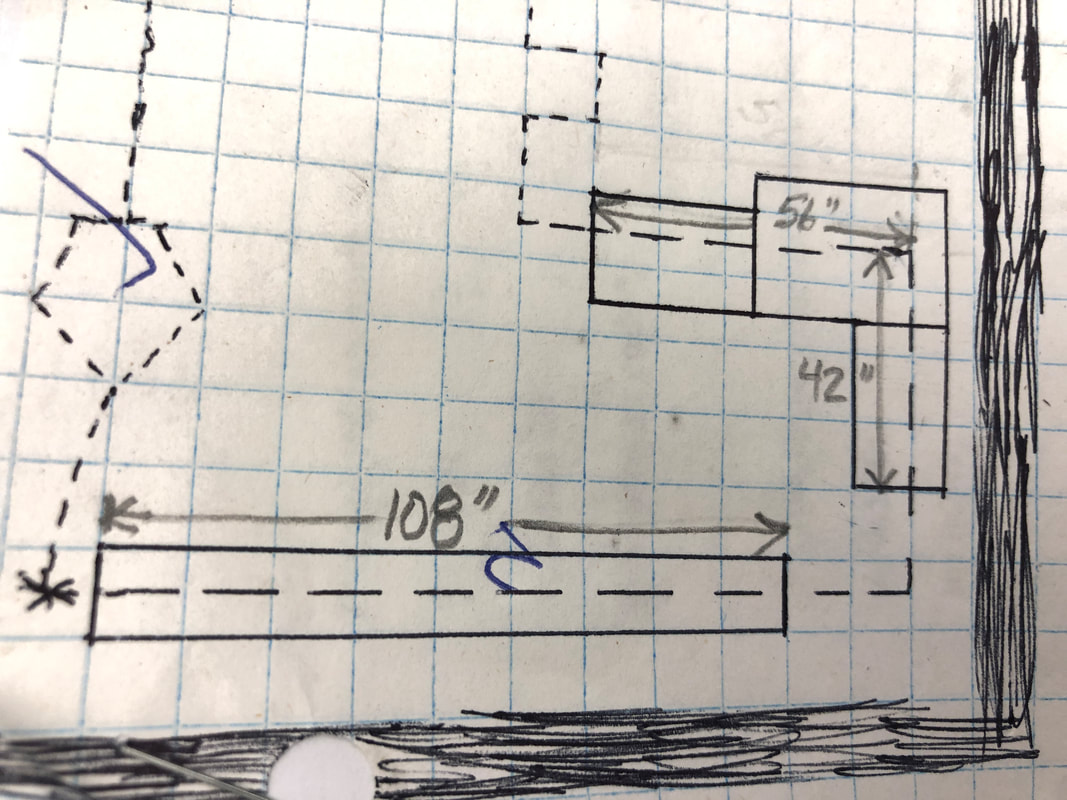
Bridges are shown on graph paper with measurements to help you with your scale drawing and to plan your code. Each square on the graph paper represents a 12" by 12" floor tile.
Due Date: Wednesday, December 2, 2020 Group A
Friday, December 4, 2020 Group B
Presentations: Monday, December 7, 2020 Group A
Tuesday, December 8, 2020 Group B
Note: Attendance at all presentations for your group is a mandatory part of the class. Students will be completing peer assessment documents associated with each project. The upper commons will be used to practice and test on the dates indicated above.
Marking
The final project plan is complete only if it includes the following items:
b. all drafts with good copy + 4 additional sequences = 85%
c. all drafts with good copy + 5 additional sequences = 95%
Note: Less than 3 additional sequences is considered incomplete because failure of one to execute properly in presentation would result in -10% = 65%. etc. Students are advised to test often and make revisions as necessary to make the code work.
The final project plan is complete only if it includes the following items:
- All graph paper drafts of the final project. For the presentation, you must staple the rough draft beneath a very neat, to scale, properly labelled graph paper drawing of all sequences in the code. Mrs. Bitner will not mark a project without all drafts given to her before the presentation. The project would be considered incomplete, and since the final project is mandatory for a pass, would result is a failure in the class.
- The two bridges shown above are mandatory parts of the final project and must be worked into the presentation. These are not counted as additional sequences.
- A minimum of three additional sequences are required. You may not use a circle/oval or square/rectangle code since we did these in a previous assignment. Anything that resembles a circle or square (i.e. diamond) will not be acceptable. A triangle is also too simple.
- Marks will be awarded as follows.
b. all drafts with good copy + 4 additional sequences = 85%
c. all drafts with good copy + 5 additional sequences = 95%
Note: Less than 3 additional sequences is considered incomplete because failure of one to execute properly in presentation would result in -10% = 65%. etc. Students are advised to test often and make revisions as necessary to make the code work.
Peer Assessment: students must complete a form for each presenter
| robotics_20_assessment_revised.docx |
Student Questions:
#1 - Can we make the remote capable of triggering sequence to begin?
see Arduino Forum for a solution
#2 - Are we able to modify the ramps on the corner bridge so that the cars do not hang up at the beginning or where the tapes connects?
Group decision: The fall Robotics 20 group made arrangements with the shop teacher, Mr. Martins, to build a new corner ramp.
#3 - Can we adjust each wheel independently? How do we tell which pin is connected to which wheel motor? Revision: We discovered that the motor controller does not allow for individual control of each motor. The motor controller runs two motors at a time.
#4 - Can I include line follower code and move into regular code without needing to touch the car? Sorry. We could not figure a way to transition between line follower or ultrasonic sensor and regular code. Feel free to take up the challenge.
|
|
| line_back_90.ino |
| line_follower_sk.ino |